
Getting started
This walk-through takes you from a fresh install to a generated exercise: create a project, import an organization’s plans, search them, connect a local model, ask for scenario ideas, generate a full scenario (overview, roles, phases, MSEL, controller handbook, rubric, player briefing and hot wash), write the inject deck with its media, edit everything, export the exercise package, and run it in facilitator mode.
It uses the fictional North Coast International Airport (NCIA) plans that ship in reference/ncia/, and LM Studio with qwen3-30b-a3b-2507. The timings come from that setup in the built app: ideas took 13 seconds, and the scenario took 5 minutes 40 seconds (39 MSEL rows, every stage ok). The screenshots were taken offline with the built-in mock provider, so the stages show mock-large instead of a real model; the MSEL, inject, facilitator and export screens show Flight to Nowhere from the bundled airport example (see Example projects).
Background reading: How a good tabletop exercise is built.
1. Install and launch
Section titled “1. Install and launch”Download the installer for your system from the latest release (see Updates for checking the download and the warnings unsigned installers get), or run the app from source as below.
Prerequisites: Git LFS (run git lfs install once before cloning), Node.js 22.12 or later, pnpm 10 (corepack enable && corepack prepare pnpm@10 --activate), and on macOS the Xcode Command Line Tools (xcode-select --install) in case a native module has to be compiled. See the README for Windows and Linux.
git clone https://github.com/actionstations-ai/actionstations.gitcd actionstationspnpm installpnpm devpnpm install also rebuilds the native modules (SQLite and its vector extension) for Electron. pnpm dev opens the app with hot reload; pnpm build:app && pnpm start runs the production build instead.
On first launch the setup wizard opens. It has six steps, each of which can be skipped and changed later:
- Welcome: what the app makes and what stays on your computer.
- Where models run: Cloud APIs only (add an API key on the next step; nothing is installed), Local tools, or A mix. For local tools it lists LM Studio, Ollama, ComfyUI and local voice, each as Detected (running), Installed, not running (with Start) or Not installed (with Download and install, Open the download page or Skip), with its size and license, followed by recommended models for this computer’s memory, each its own optional download. Installs fetch only the vendor’s official installer, on your click, and check the publisher signature before anything runs (on Linux, Ollama installs into your home folder without sudo after checking its published sha256) (see Local tools setup). The same choice is in Settings → Local tools.
- Text model: detects LM Studio and Ollama on this computer, lets you pick a model (embedding models are never offered as the writing model; the largest chat model is the default unless one is already loaded) and add the provider with one click, or add an Anthropic API key. It routes ideation, drafting and critique to your choice.
- Media: checks ComfyUI and its default workflows for images and video, and adds a local voice server (mlx-audio) for speech; it routes the image, video and audio tasks. The operating system’s own voice is added later from Providers (step 5 below).
- Search quality: keep the built-in keyword hashing, or download the local embedding model (133 MB, once) for better search.
- First project: create a project.
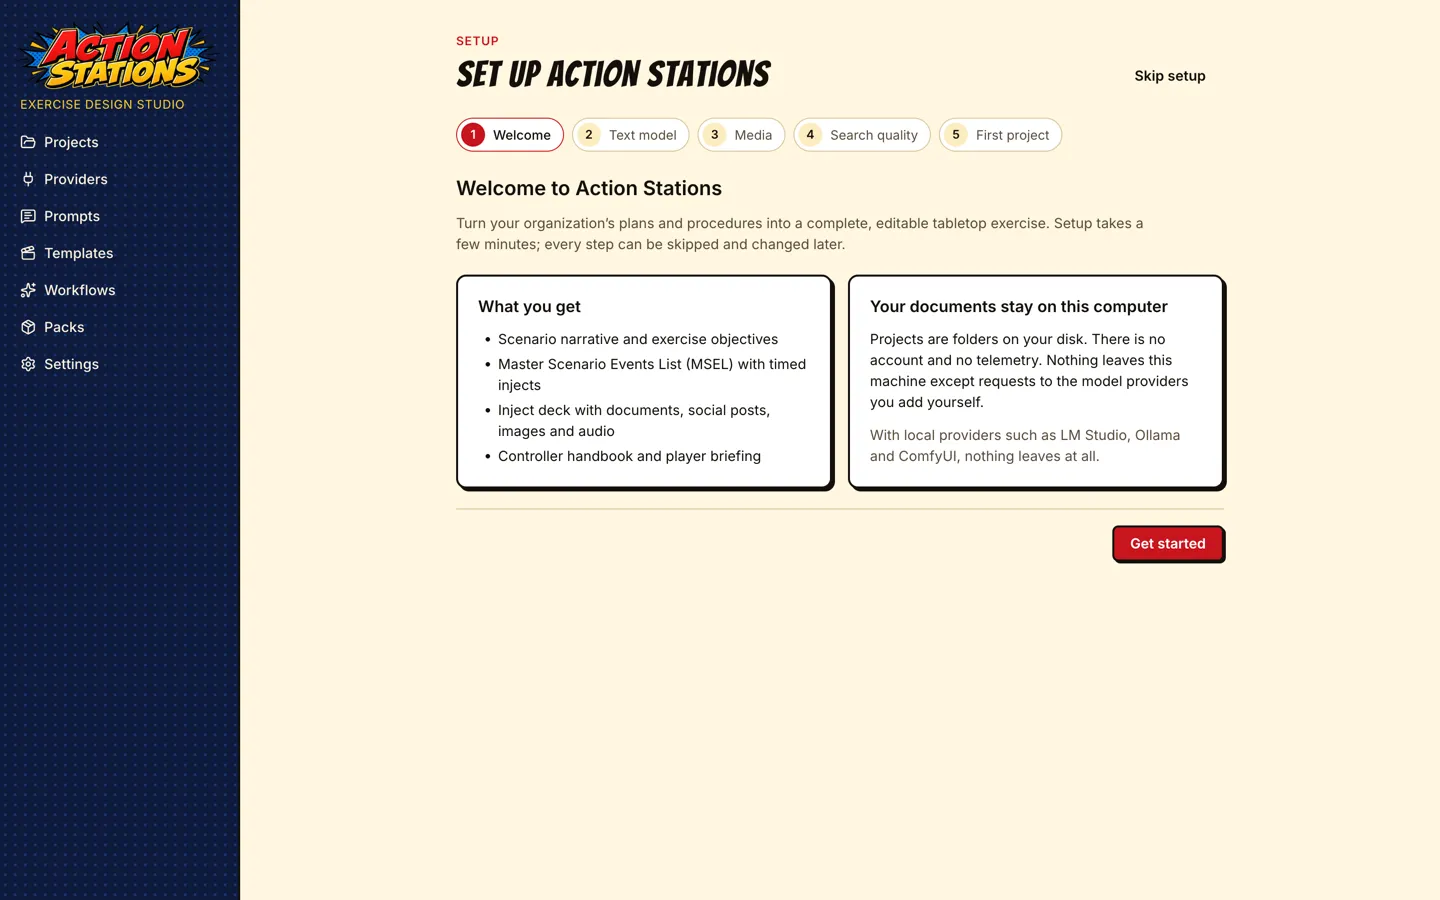
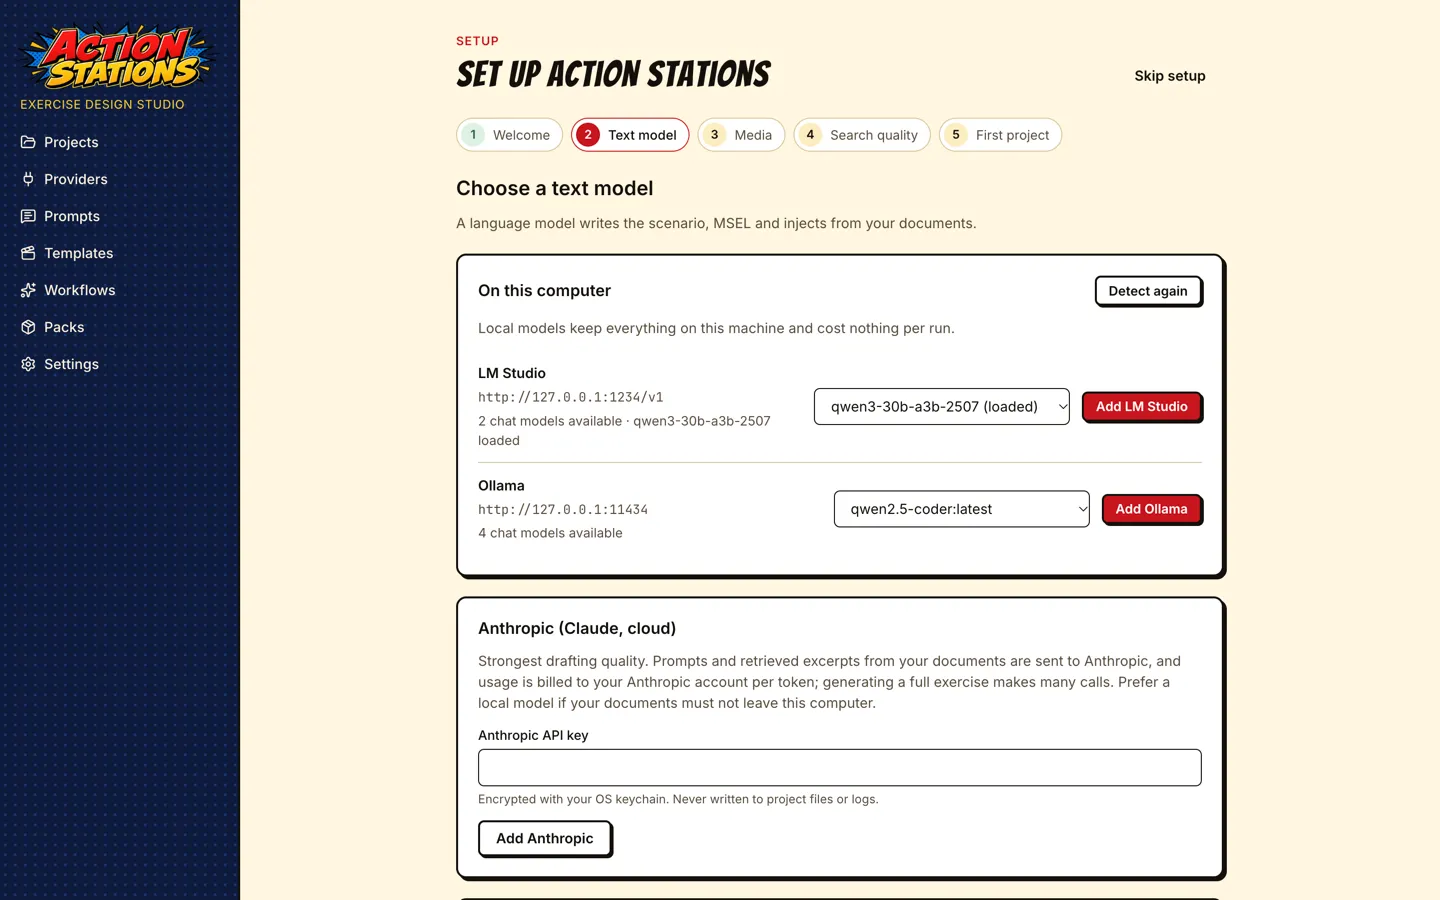
Skip setup goes straight to the Projects screen. You can run the wizard again from Settings → Run setup again. The rest of this guide shows the same steps on the regular screens, which is also where you change them later.
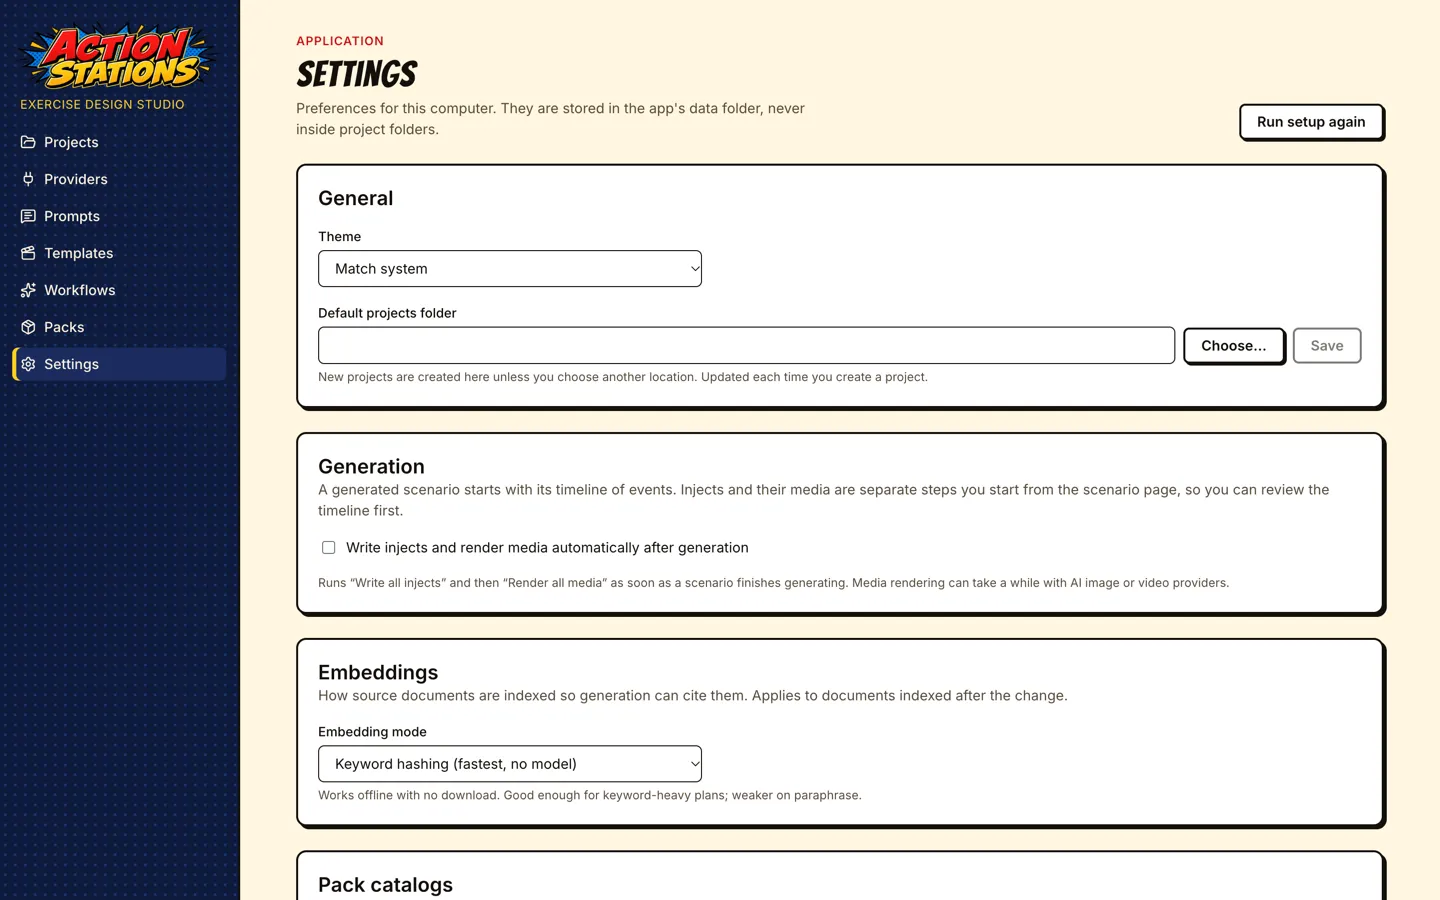
The Projects screen shows a Tip card: one short tip about a feature, with a link to the guide section that explains it (opened in your browser). Next tip shows another, Hide removes the card until the next launch, and Turn off tips removes it for good. Each launch starts with the tip after the last one shown. Tips ship with the app, so showing them sends nothing over the network. Turn them back on with Settings → General → Show a tip on the Projects screen.
Settings also holds the default projects folder, the theme, the tip of the day, the embedding mode and Generation → Write injects and render media automatically after generation (see step 8).
The sidebar has two parts: application screens (Projects, Providers, Prompts, Templates, Workflows, Settings) and, once a project is open, that project’s screens. These are grouped into Build (Overview, Documents, Facility facts, Generate, Scenarios, Facilitate) and a collapsible Advanced group (Search index, Prompt overrides, Provider routing). Advanced starts closed, remembers whether you opened it, and stays open while you are on one of its pages.
Updates
Section titled “Updates”The app can tell you when a newer release is out. The check is off until you turn it on: the setup wizard’s last step has an unticked box Check for new versions of Action Stations when the app starts, and if you skipped the wizard, the Projects screen asks once (Turn on or No thanks; unanswered, it asks on three launches and then counts as no). Change it any time in Settings → Updates.
With the check on, the app sends one request to api.github.com at most once a day, 10 seconds after it starts. The request names the app and its version (User-Agent: ActionStations/0.6.0) and nothing else: no account, no cookies, nothing about you or your projects. GitHub sees your IP address. Settings → Updates → Check now checks at once, whatever the setting, and shows the installed version, the time of the last check and its result. Failures (offline, timed out, GitHub’s limit of 60 checks an hour from one network) are shown only there.
When a newer release exists, the Projects screen shows Action Stations X.Y.Z is available, with Release notes, Download page and Not now (which hides that version; a later one shows again). The release notes name the installer for your computer and its .sha256 file. The app never downloads or installs anything: Download page opens the release on GitHub in your browser. To install:
- Download the installer and its
.sha256file from the release page. - Check the download:
shasum -a 256 <file>(macOS, Linux) orGet-FileHash <file> -Algorithm SHA256(Windows PowerShell) must print the hash in the.sha256file. - The installers are not code-signed yet, so your operating system warns. macOS: on macOS 15 and later open System Settings → Privacy & Security and click Open Anyway (on macOS 14 and earlier, right-click the app and choose Open). Windows: “Windows protected your PC” → More info → Run anyway. Linux:
chmod +xthe AppImage and run it.
If you installed 0.5.0 on Windows, uninstall it before installing a later version: the app id changed in 0.5.1, so Windows would otherwise keep two copies. Your settings and projects stay. The banner and the release notes say so when it applies.
2. Create a project
Section titled “2. Create a project”A project is a folder on disk that holds one organization’s documents and every exercise built from them. You can copy it, back it up or put it under version control.
Click New project and fill in:
- Project name: also used for the folder name (
<name>.asproj). Projects made before the app was renamed are named<name>.ttxproj; they open, list and duplicate the same way. On macOS, double-clicking a project folder in Finder opens it in the app. - Organization: the name as it should appear in briefings and injects.
- Domain: the kind of organization (a domain profile): Airport, Transit (bus / rail), Dam / water authority, Water utility, Energy utility, Healthcare, Campus, Stadium / venue, Port / maritime, Municipal government, Industrial / manufacturing, Unmanned systems operator, K-12 school district, Commercial facilities (retail, lodging, casino), Food and agriculture, Telecommunications carrier / ISP, Data center / IT service provider, Community bank / credit union or Generic organization. Type in the search box (
bus,dam,hospital,drone,school,bank) to narrow the list, then click a profile or move with the arrow keys. The profile sets the vocabulary, the facility-fact categories, typical roles and outside parties, and the threat families the generator offers. Projects created before profiles existed keep their stored value; the picker says which profile it resolves to (for example Saved as “hospital”, which uses the Healthcare profile). - Location: the parent folder (Choose… opens a folder picker). Set a default under Settings → Default projects folder.
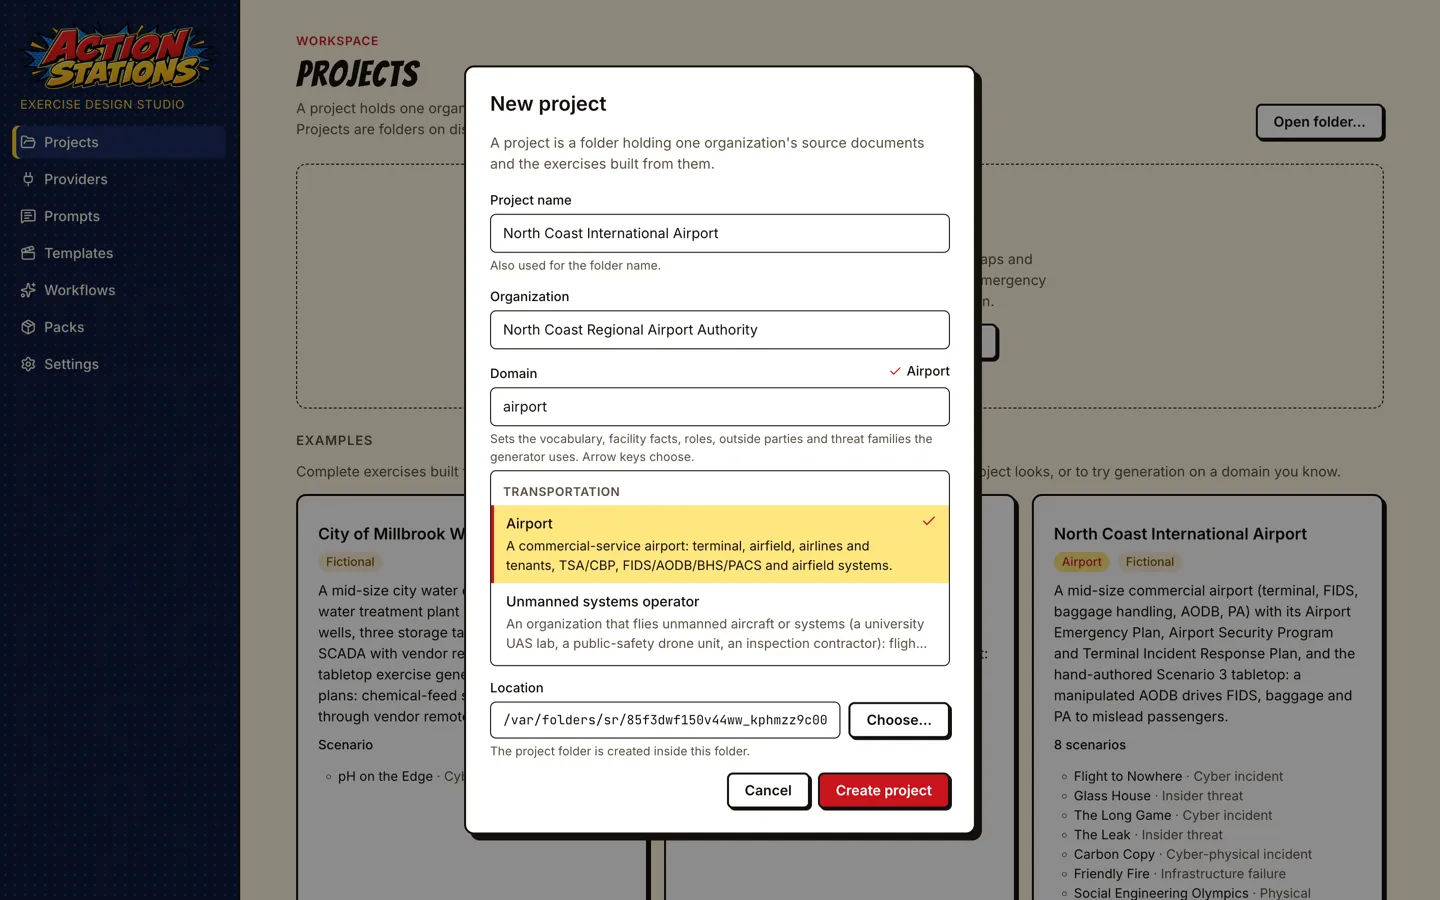
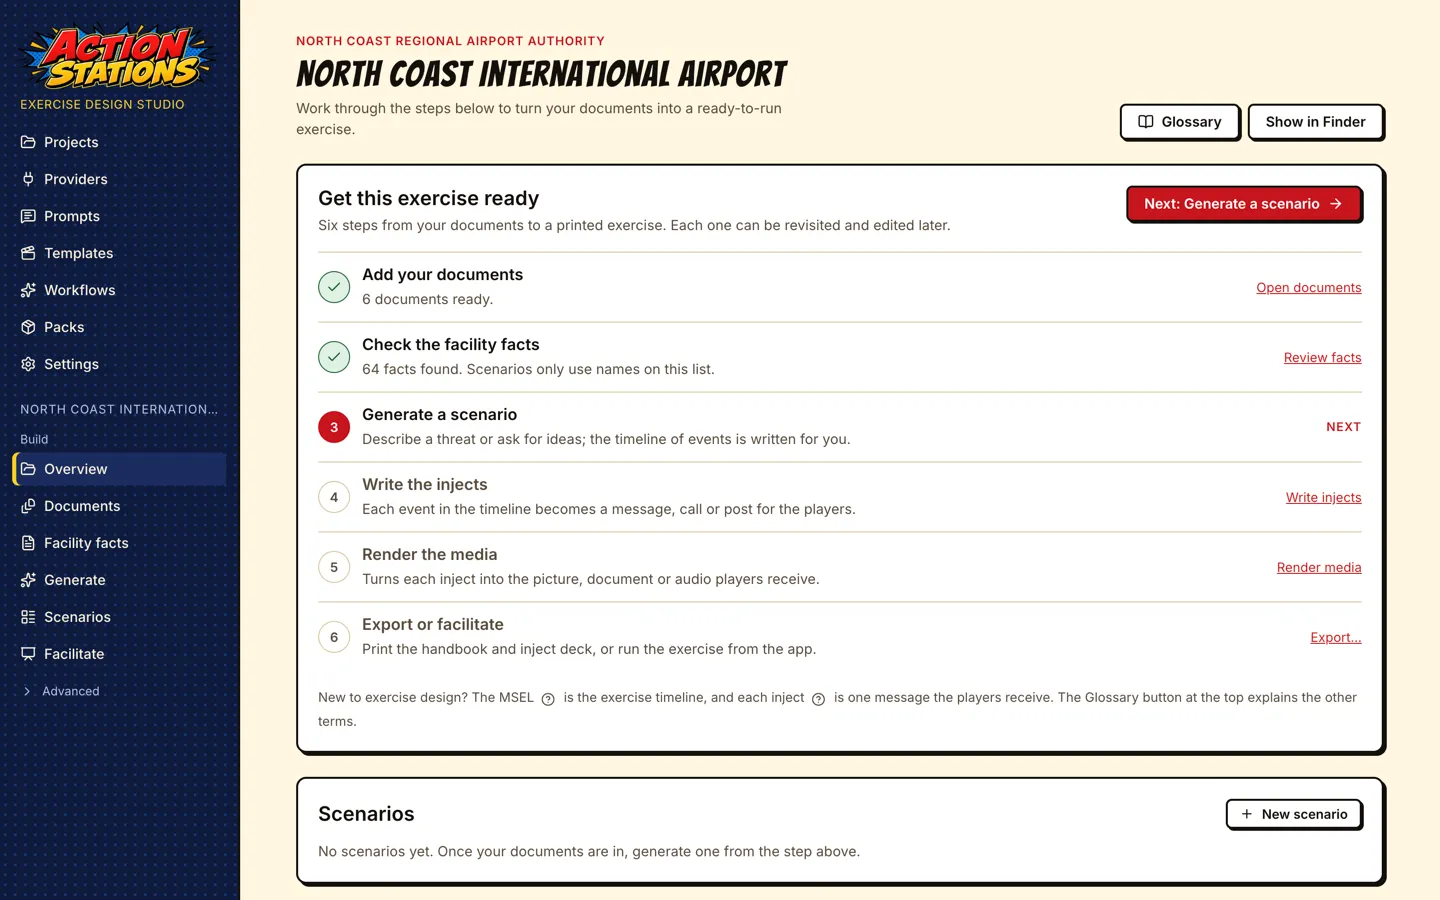
Create project opens the project’s Overview. At the top, Get this exercise ready lists the six steps (add documents, check the facility facts, generate a scenario, write the injects, render the media, export or facilitate) with what is done so far; the Next button opens the first step still to do. Below it are the project’s scenarios with their status, and a collapsed Project settings section (it remembers whether you left it open). The Glossary button explains terms such as MSEL, inject, STARTEX / ENDEX, SimCell and hot wash; a ? next to a term explains just that one.
Open Project settings to edit the project. The same domain picker is under Organization; below it, Customize vocabulary edits this project’s player roles, outside parties, IT systems and OT / control systems as chip lists (type and press Enter to add, × to remove). A list you change replaces the profile’s list for this project only; Reset to … defaults removes your changes. Fill in Brand and locale (city, region, primary colour, and an optional Logo: Choose logo… copies a PNG, JPEG or WebP of up to 2 MB into the project’s brand/ folder at once; memos, press releases, SITREPs, letters from your own organization and the exercise plan cover then show it) and Aliases (for example orgShort → NCIA, localTv → Channel 5): inject templates read these instead of hard-coding names. Default roles pre-fills the player roles of new scenarios. Click Save settings.
Example projects
Section titled “Example projects”Projects → Examples lists ready-made projects built from fictional organizations’ documents, each with its domain, a summary and its scenarios (with their threat families). Open a copy asks where to put the copy (default: the default projects folder from Settings, else a folder in your Documents folder), copies the example into a new folder (never over an existing one: a second copy gets -2), and opens it. The example as shipped is never changed. A project opened from an example shows the example’s notice at the top of every project screen. The search index is not shipped; it is rebuilt from the documents when the copy opens, as it is for any project folder opened without index.sqlite (a duplicate, or a folder from version control). The setup wizard’s First project step offers the same examples under Or explore an example. Examples from enabled packs are listed too, with a line naming the pack, its version and its license (for example From the Freight Rail Operations pack (1.0.0) · License CC-BY-4.0); a copy of one names the pack in its notice, and keeps working after the pack is disabled or uninstalled, including its domain profile.
The project folder contains project.json, documents/, scenarios/, prompts/ (project prompt overrides), index.sqlite (the search index), ideas.json and facility-facts.md (see Facility facts). Its .gitignore excludes the search index and caches, which can be rebuilt.
3. Import documents
Section titled “3. Import documents”Open Documents and click Import documents…, or drop files anywhere on the window. PDF, Word, PowerPoint, Excel, Markdown, HTML, plain text and images (with OCR) are supported. Each file is copied into the project’s documents/ folder, parsed into heading-aware sections and indexed. For this walk-through, import the six Markdown files in reference/ncia/ and reference/ics-forms/.
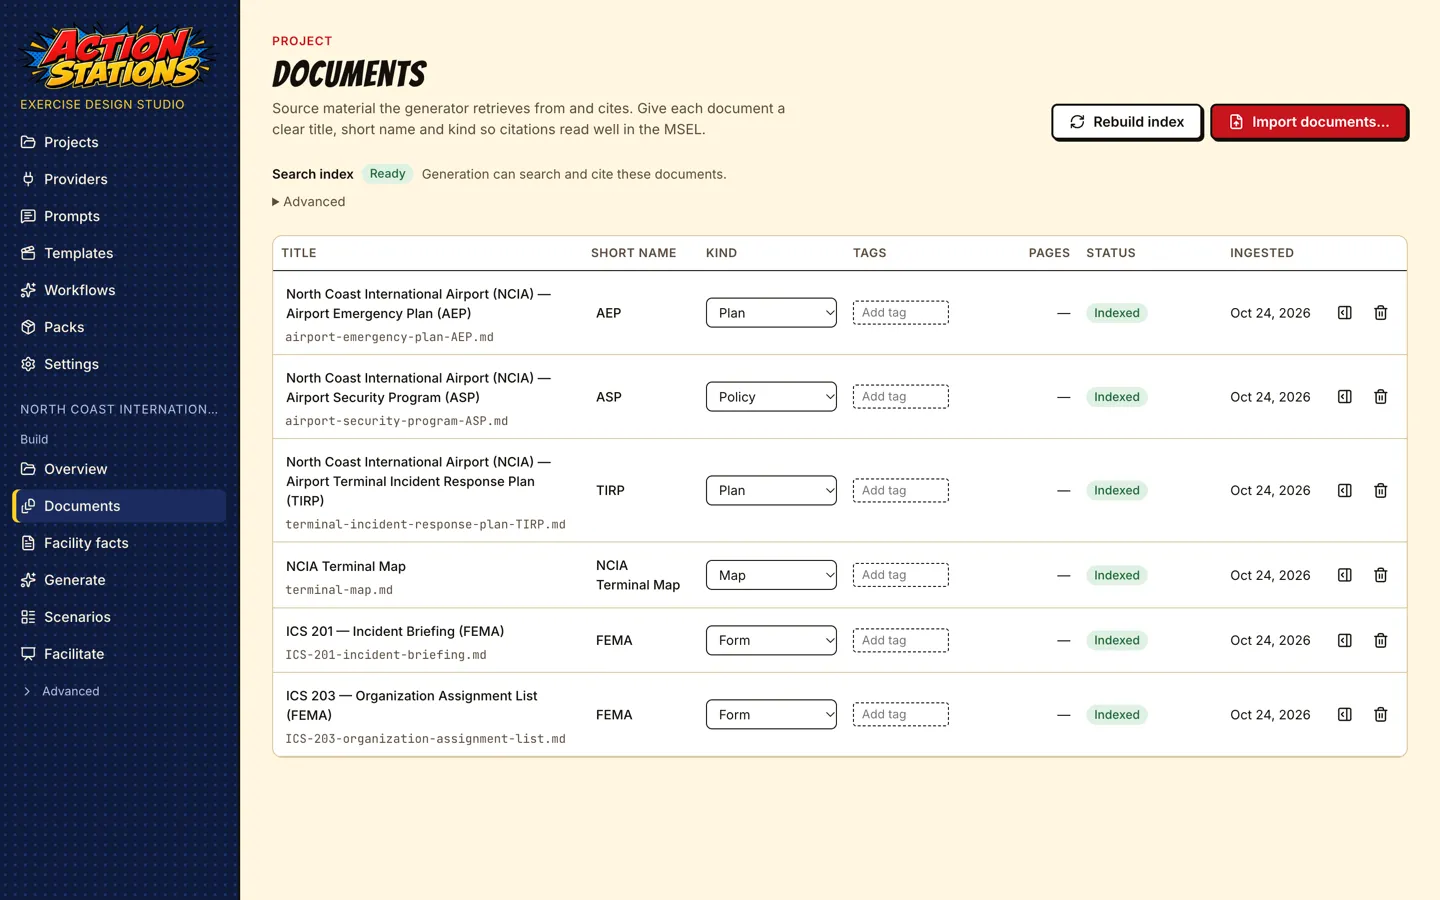
Measured: the six NCIA documents imported and indexed in 0.4 seconds (142 sections).
For each document, check:
- Title and Short name: citations read as
<short name> › <section>, for exampleTIRP › Section 13 › 13.6. Click a title or short name to edit it. - Kind: plan, policy, map, form, course, prior exercise or other.
- Status: Indexed when the document is searchable.
The Embeddings line shows the index’s embedding mode (with this project’s Embeddings routing when it overrides the global one). The default, Keyword hashing, works offline with no download; see Embeddings for the other modes and their current limits. After changing the mode, click Rebuild index.
Facility facts
Section titled “Facility facts”After every import or Rebuild index the app writes facility-facts.md in the project folder: the runways, taxiways, gates, concourses, rooms and areas, equipment, hostnames, IP ranges, phone numbers and agencies your documents state, one ## Section per category and one - bullet per identifier. Generation hands this list to the model as the only real identifiers, and the MSEL check flags rows that name a runway, taxiway, gate or concourse that is not in it (unless the row frames it as the attacker’s fake data).
Some nouns name different things in different rows. A dam’s “Unit 4” is a generating unit in a powerhouse row and a sheriff’s patrol car in a security row, so the profile checks the broad noun (Unit, Gate, Zone, Station, Section, Route) only when the row is about that kind of thing (for a dam unit: generation, turbines, the powerhouse, MW) and never after a responder or access word (“Patrol Unit 4”, “Access Gate 2”, “State Route 9”). The specific nouns (“Generating Unit 3”, “Spillway Gate 6”, “Inundation Zone D”) are always checked. A name that is close to a documented one is reported as a suggestion: “Confluence Park Station (did you mean Confluence Station?)”.
Open Facility facts in the project sidebar to correct the list. Each category is a section; every entry shows whether it came From documents (with where it was found, for example Airport Emergency Plan › 2.2 Scope) or was Added by you.
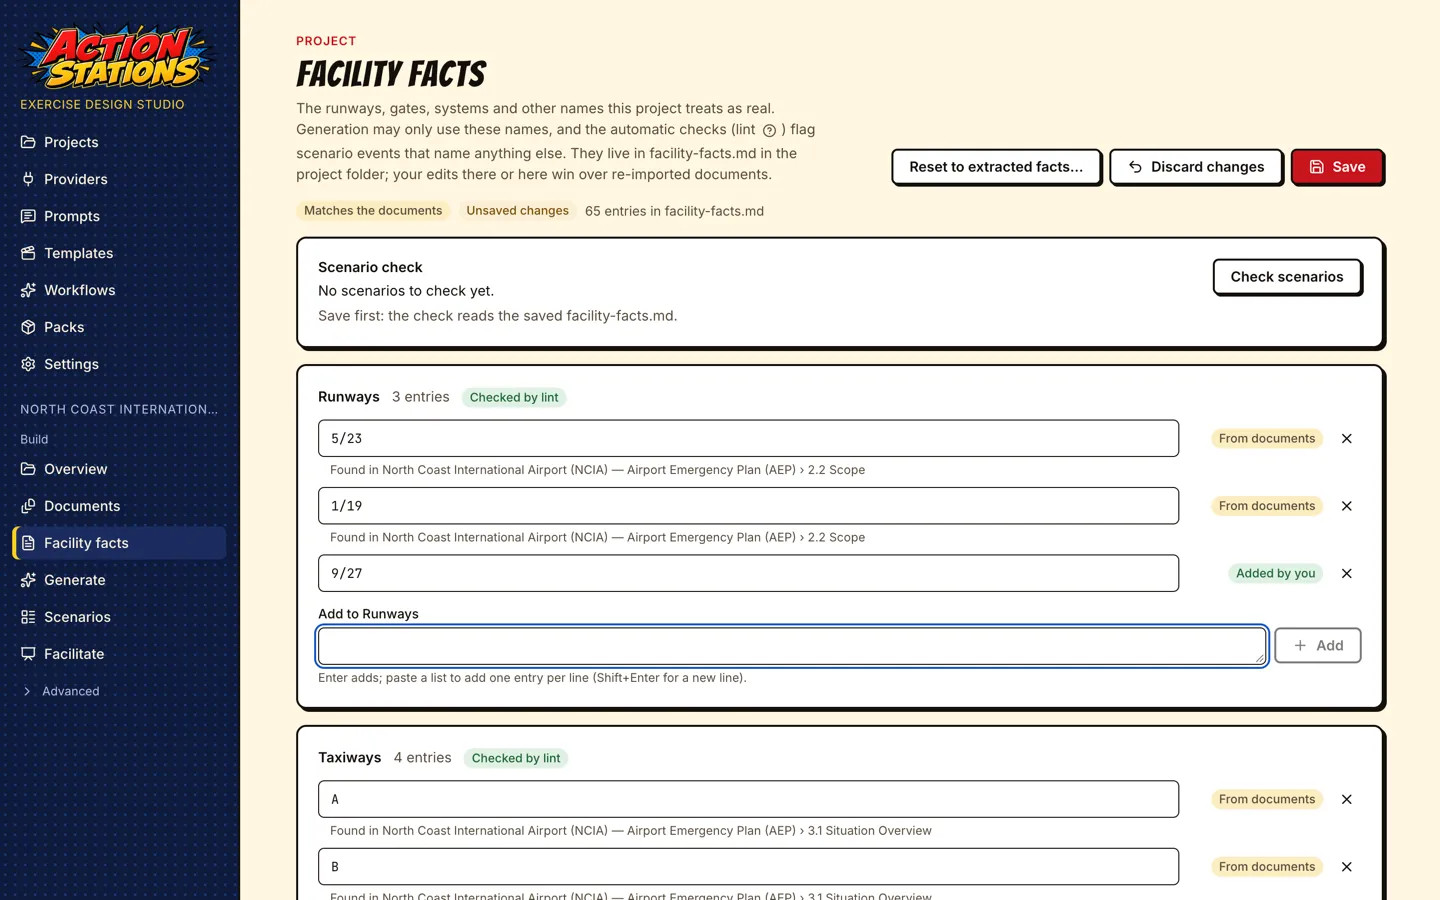
- Add what the extraction missed, for example a runway that only appears on an image-only map: type
9/27in Add to Runways and press Enter. Paste a list to add one entry per line. Rows naming Runway 9 or 27 are then accepted. - Edit or remove what is wrong, for example a gate range that belongs to the perimeter fence rather than the terminal: change the entry, or press × (or Backspace in an empty entry). Extracted entries you removed are listed under the section with Restore. Rows naming a removed gate are then flagged.
- Add a category under Add a category (for example Pump stations); its entries are shown to the model but not linted until you give it a lint definition (see What lint looks for). Only categories marked Checked by lint produce warnings.
Save (or Ctrl+S / Cmd+S) writes facility-facts.md; Discard changes goes back to the saved file. After every save the Scenario check re-lints the project’s scenarios and says how many unknown-identifier warnings (FACILITY_UNKNOWN_ID) there are now compared with when you opened the screen; Check scenarios runs it again, and each scenario’s Warnings tab shows the rows.
To catch impossible quantities, add a section named Limits with one bound per entry, written <what>: <number> <unit>, for example Chlorine, largest container: 1 ton or Pressure District 7 MAOP: 2 psig. A row that names every key word of an entry and, in the same sentence, a larger amount of the same kind (mass in lb, tons, tonnes or kg; volume in gallons, liters, barrels or m³; pressure in psi, psig, bar, kPa or in. w.c.) gets a QUANTITY_OVER_LIMIT warning. Rates such as “40 lb a minute” are not checked.
You can also edit facility-facts.md in any text editor: one ## Section per category and one - bullet per entry. If the file changes on disk while the screen has unsaved edits, Save is refused and the screen offers to reload the file.
Your edits win. Once you have changed the file, importing more documents no longer overwrites it; the fresh extraction is written to facility-facts.generated.md next to it, and the screen lists what it found that your list lacks. To start over from the documents, click Reset to extracted facts and confirm. Every save and reset first keeps the previous file in .cache/facility-facts-history/ (the last 20 versions; the project’s .gitignore excludes .cache/).
What lint looks for
Section titled “What lint looks for”Each category the domain profile defines has Edit lint definition under its heading: what the extraction and the Scenario check look for in a text. The fields are:
- Noun: the word before an identifier, as a case-insensitive regular expression:
|between alternatives,?for an optional letter,(?:…)for a group. Airports useGates?; tightening it toJet Gates?stops a row about “Gate 99” at the perimeter fence from being flagged. - Generic noun and Context: a broader noun (
Units?) that counts only where the context matches (turbine|powerhouse|\bMW\b) and never after a qualifier such as Patrol or Access. A generic noun needs a context. - Identifier shape: letters and numbers (
A1,B12, rangesA1–A8), numbers only, runway pairs (5/23), or a noun glued to a number (RTU-07). - Checked by lint and Complete list (the model sees every identifier instead of the first 20).
Enter in any field saves, Escape closes the form. Patterns that are not valid, use capturing groups (…), look-arounds or back-references, repeat a group that itself repeats ((?:a+)+), match empty text or run longer than 200 characters (400 for a context) are refused with the reason. Saving writes the project’s whole category list to domainProfileOverrides.factCategories in project.json, extracts the facts again and re-runs the Scenario check. If you have edited facility-facts.md, it is kept and the new extraction goes to facility-facts.generated.md (shown under “From the documents, not in your list”); lint uses the new definition right away. Use the domain’s definition undoes the change for one category. Save or discard unsaved entry edits first.
A category you added yourself (for example Pump stations) has Define for lint once the file is saved. It opens the same form with an empty noun: give one (Pump Stations?), choose the identifier shape (numbers only for Pump Station 7) and save. The definition is added after the domain’s categories in domainProfileOverrides.factCategories under the category’s id from facility-facts.md (pump-stations, as written in the <!-- category: pump-stations --> line), so nothing in the file is renamed; from then on a row naming Pump Station 7 when the list has 1 and 2 gets a FACILITY_UNKNOWN_ID warning. Remove the lint definition takes it out again and the category goes back to being shown to the model only. The built-in categories without a noun (hosts, phone numbers, networks and the like) are not offered a definition.
4. Search the plans
Section titled “4. Search the plans”Open Search index and try the systems your exercise should test, for example FIDS failure manual announcements. This is the same hybrid search (keyword plus vector, fused by rank) that every generation stage uses to retrieve and cite sections, so it shows what the generator will find.
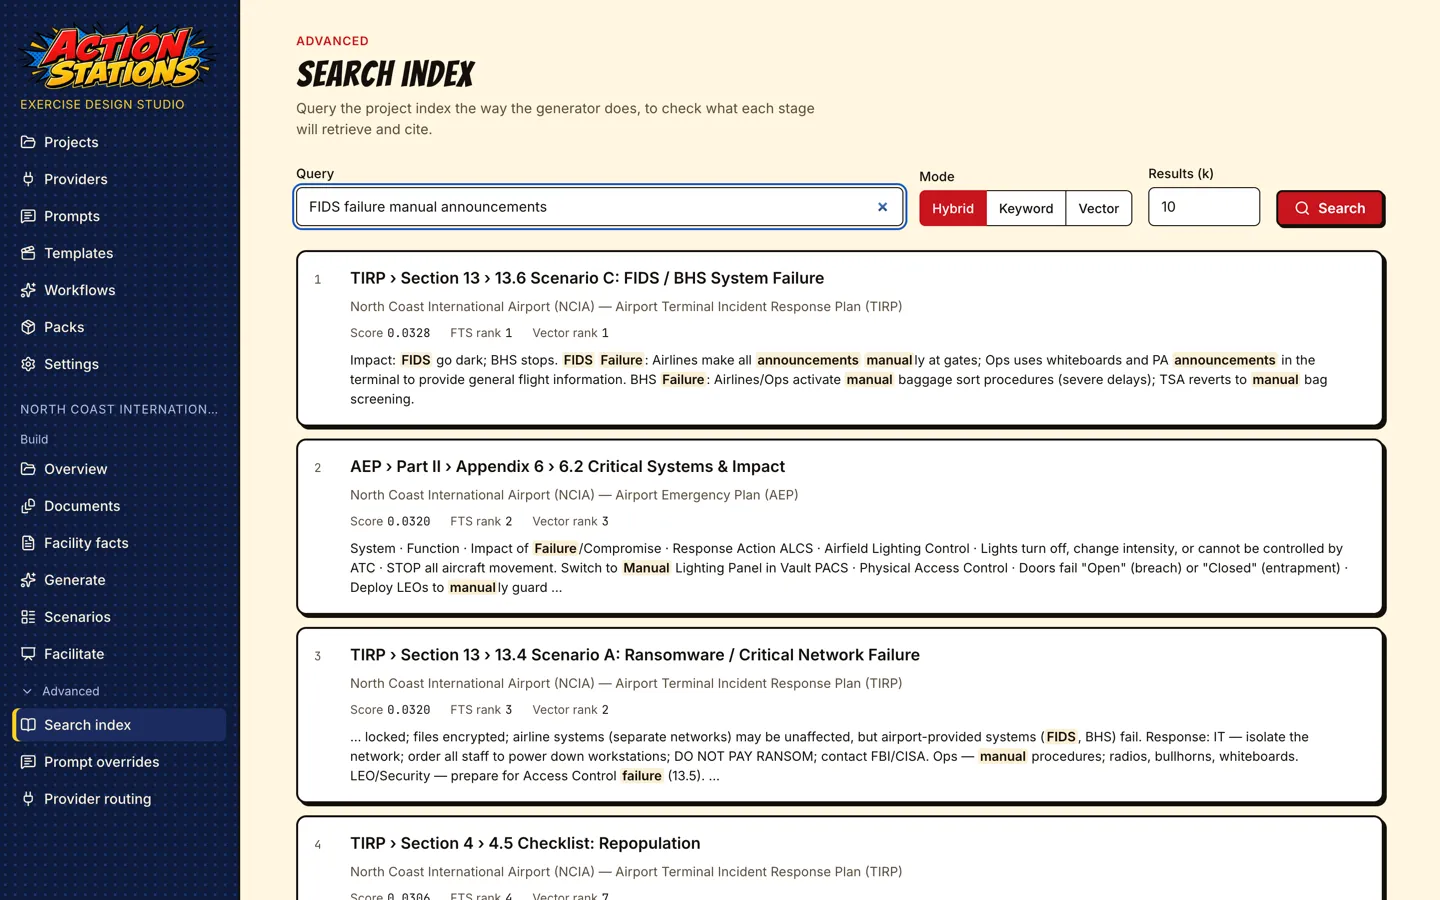
Here the top hit is TIRP › Section 13 › 13.6 Scenario C: FIDS / BHS System Failure, followed by AEP Appendix 6. If a section you care about does not come up, retitle the document, check that it was parsed with its headings, or add the plan’s own wording to your brief.
5. Connect a model
Section titled “5. Connect a model”Generation needs a text model. If you set one up in the wizard, skip to step 6. This walk-through uses LM Studio; see the provider guides for LM Studio, Ollama, Anthropic, ComfyUI and local TTS.
-
Start LM Studio’s server and load a model with at least 32K context:
Terminal window lms server startlms load qwen/qwen3-30b-a3b-2507 --identifier qwen3-30b-a3b-2507 --context-length 32768 -y -
In the app, open Providers and click Detect local services. It looks for LM Studio, Ollama, ComfyUI and a system voice (macOS
say, Windows SAPI,espeak-ngon Linux) on this computer only; a row appears only for what it finds. Click Add next to LM Studio.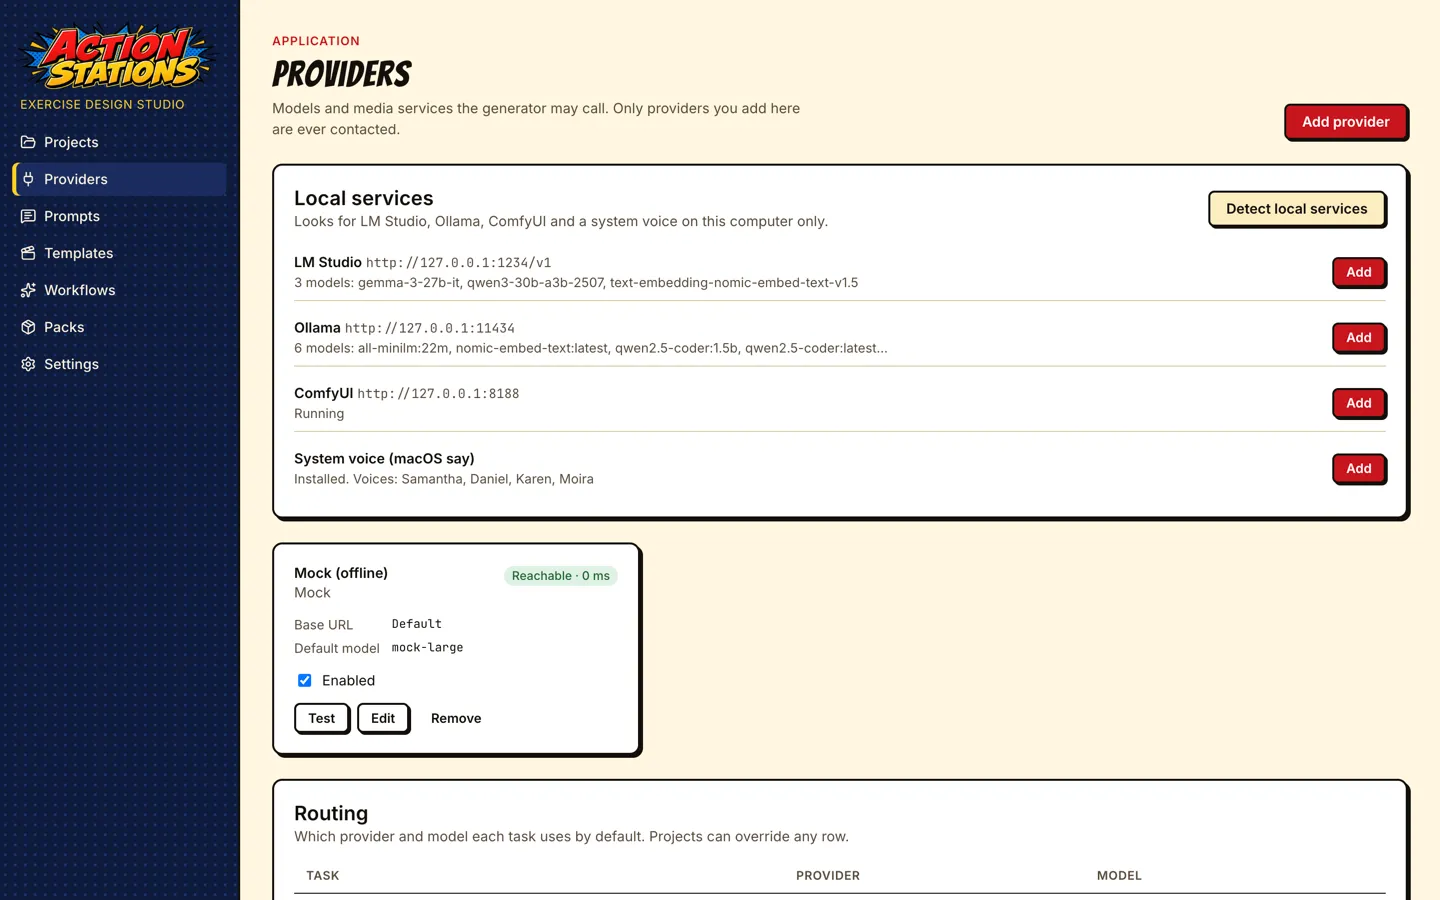
-
On the LM Studio card, click Edit and set Default model to
qwen3-30b-a3b-2507(detection picks the first model alphabetically). Click Test: it should answer “OK” in well under a second. -
In Routing, set Ideation, Drafting and Critique to LM Studio. To have voice lines without a TTS server, Add the System voice row as well and set Audio to it (see System voice).
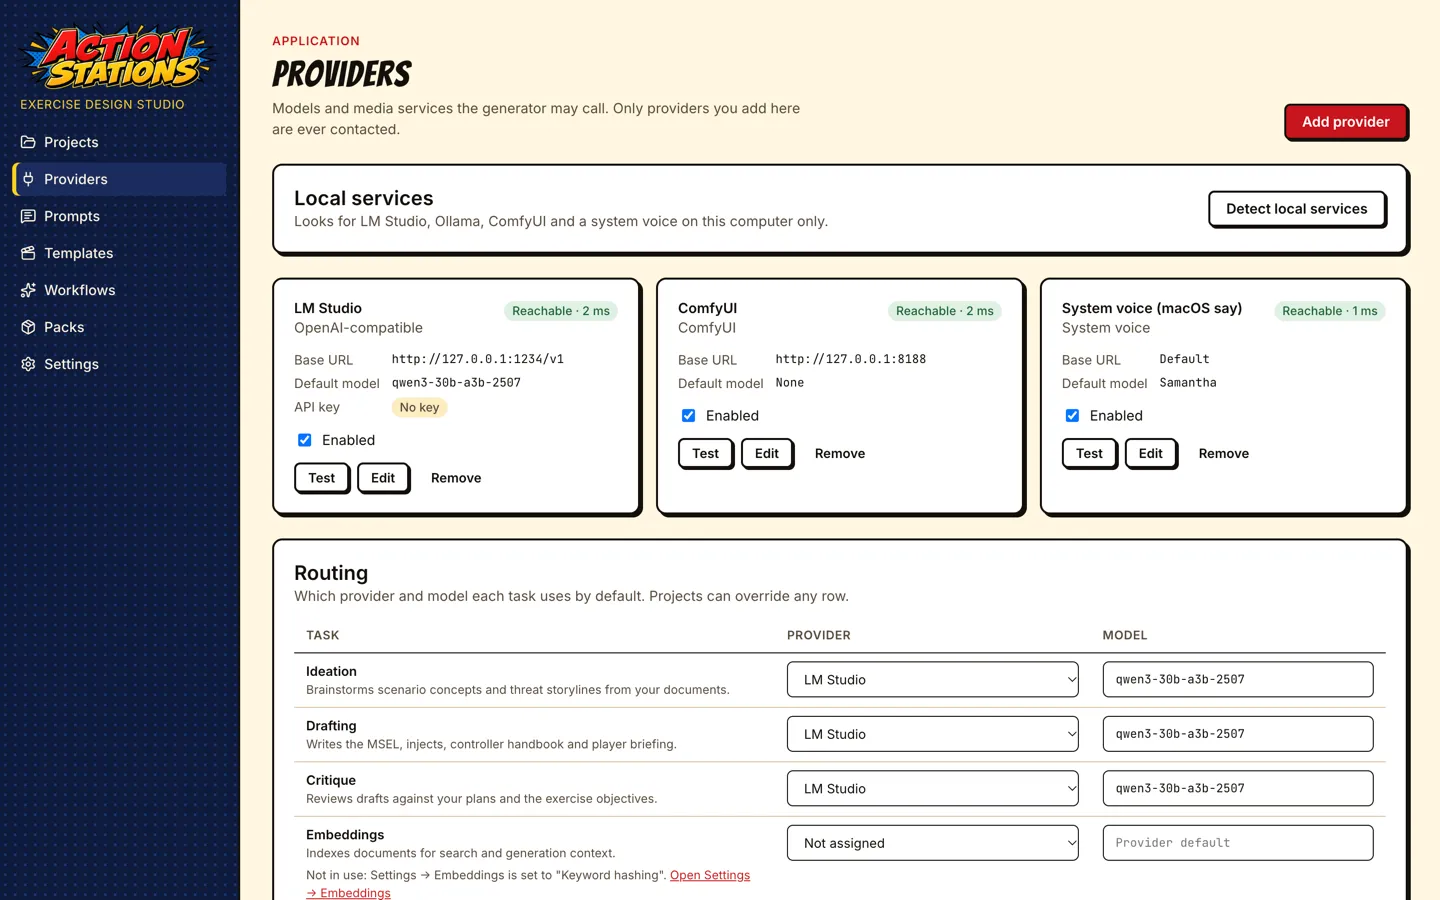
A project can override any routing row on its own Provider routing page.
6. Ask for ideas
Section titled “6. Ask for ideas”Open Generate and choose Give me ideas. Optionally type a focus (“insider threat”, “baggage systems, severe weather plus a cyber twist”), choose how many ideas (1 to 12), and click Give me ideas.
The model reads the sections retrieved from your plans and proposes distinct concepts, each with a hook, the threat, the systems affected, why it teaches, suggested roles, a difficulty, and the plan sections it exercises (as citation chips).
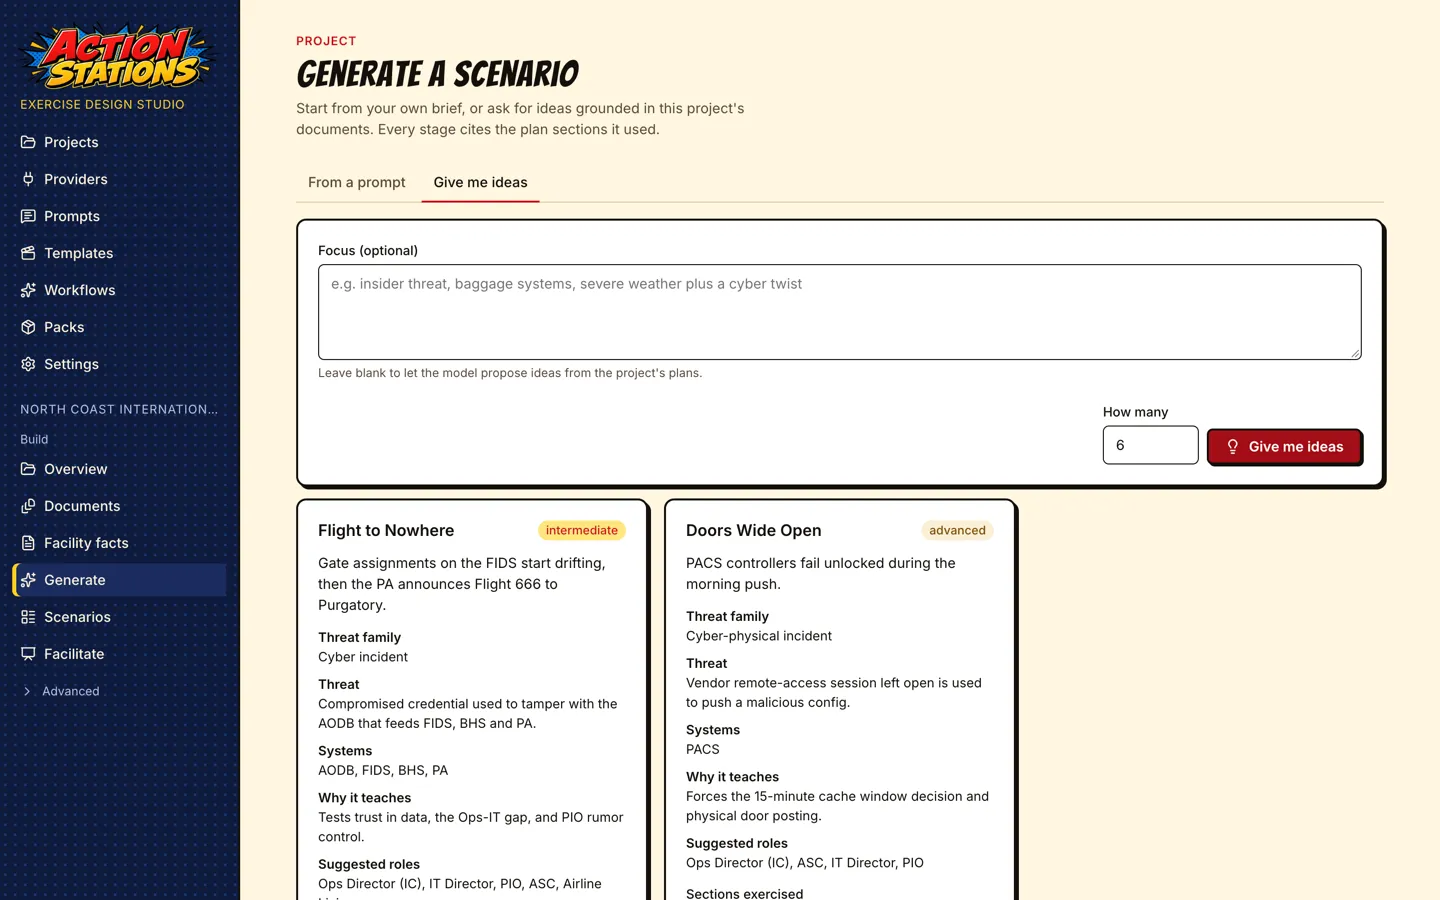
Measured: 4 ideas in 13 seconds.
7. Generate the scenario
Section titled “7. Generate the scenario”Click Develop this on an idea. The From a prompt tab opens with the brief filled in from the idea: threat or theme, audience roles, duration, number of phases, start time, learning objectives, and constraints (the plan sections it must test). Edit anything, then click Generate scenario.
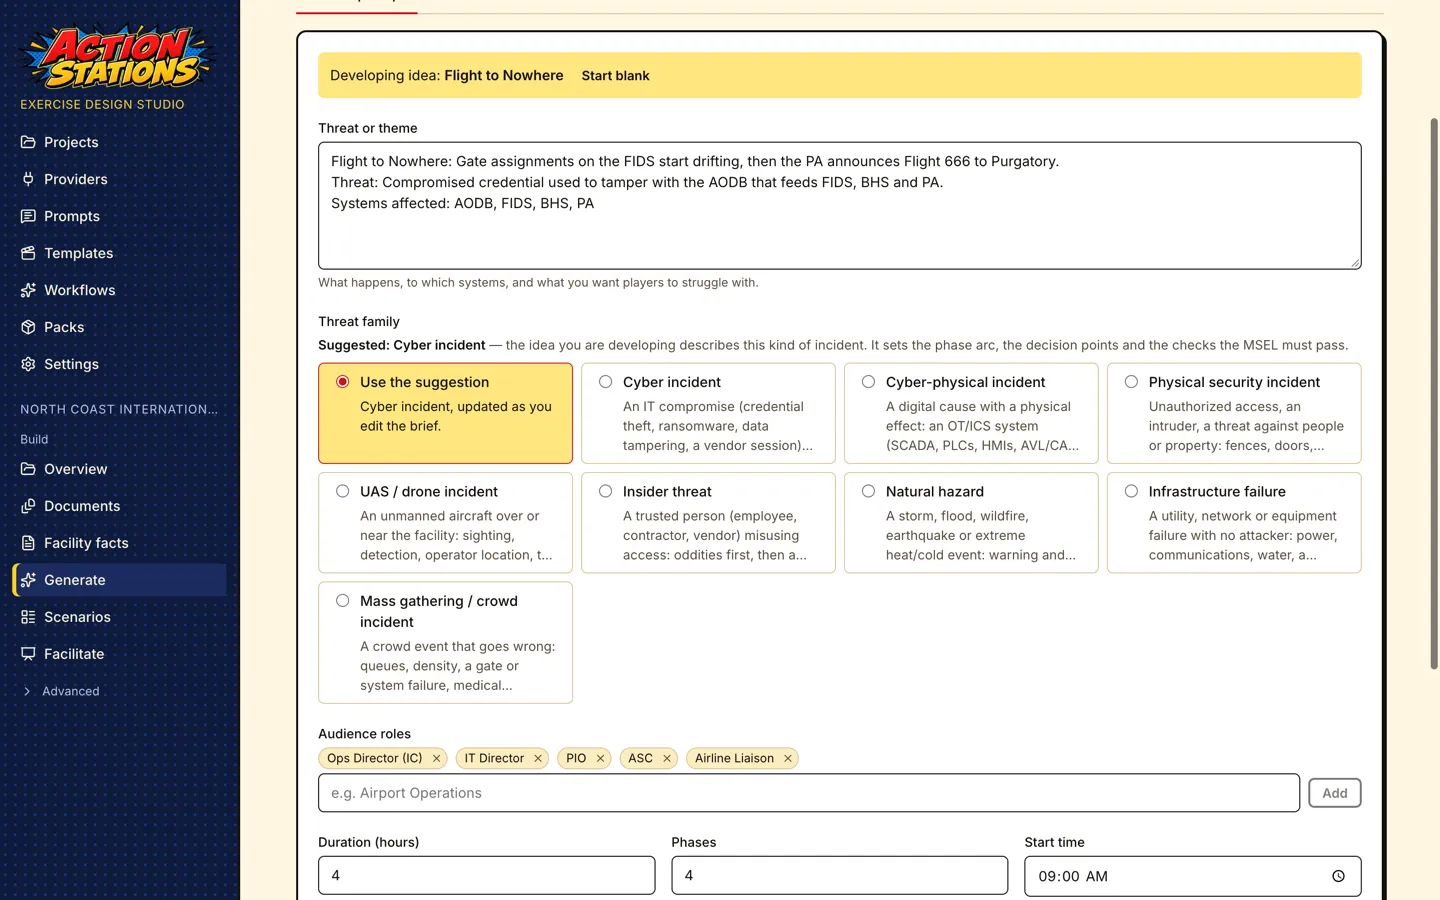
You can also start from From a prompt without an idea: describe the threat, list the roles and constraints, and generate.
Threat family sets the phase arc, the decision points and the lint checks of the scenario (cyber, cyber-physical, physical security, UAS / drone, insider, natural hazard, infrastructure failure, mass gathering; only the families the project’s domain supports are listed). It starts on Use the suggestion, which shows the family the generator would pick and why: the idea you are developing, words in the brief (the brief mentions “drone”), or the domain’s default. The suggestion updates as you edit the brief. Choose a family to override it; your choice is what the scenario gets. Idea cards show each idea’s threat family too.
The scenario page opens and follows the run: the bar above the tabs reads Generating the scenario… with a progress bar, and the collapsed Advanced information section at the bottom of the page opens on its own while the job runs. In it, Stages lists each completed stage with its model, tokens and duration, and the Generation log streams progress and each stage’s raw output. Click Advanced information to close or reopen it at any time.
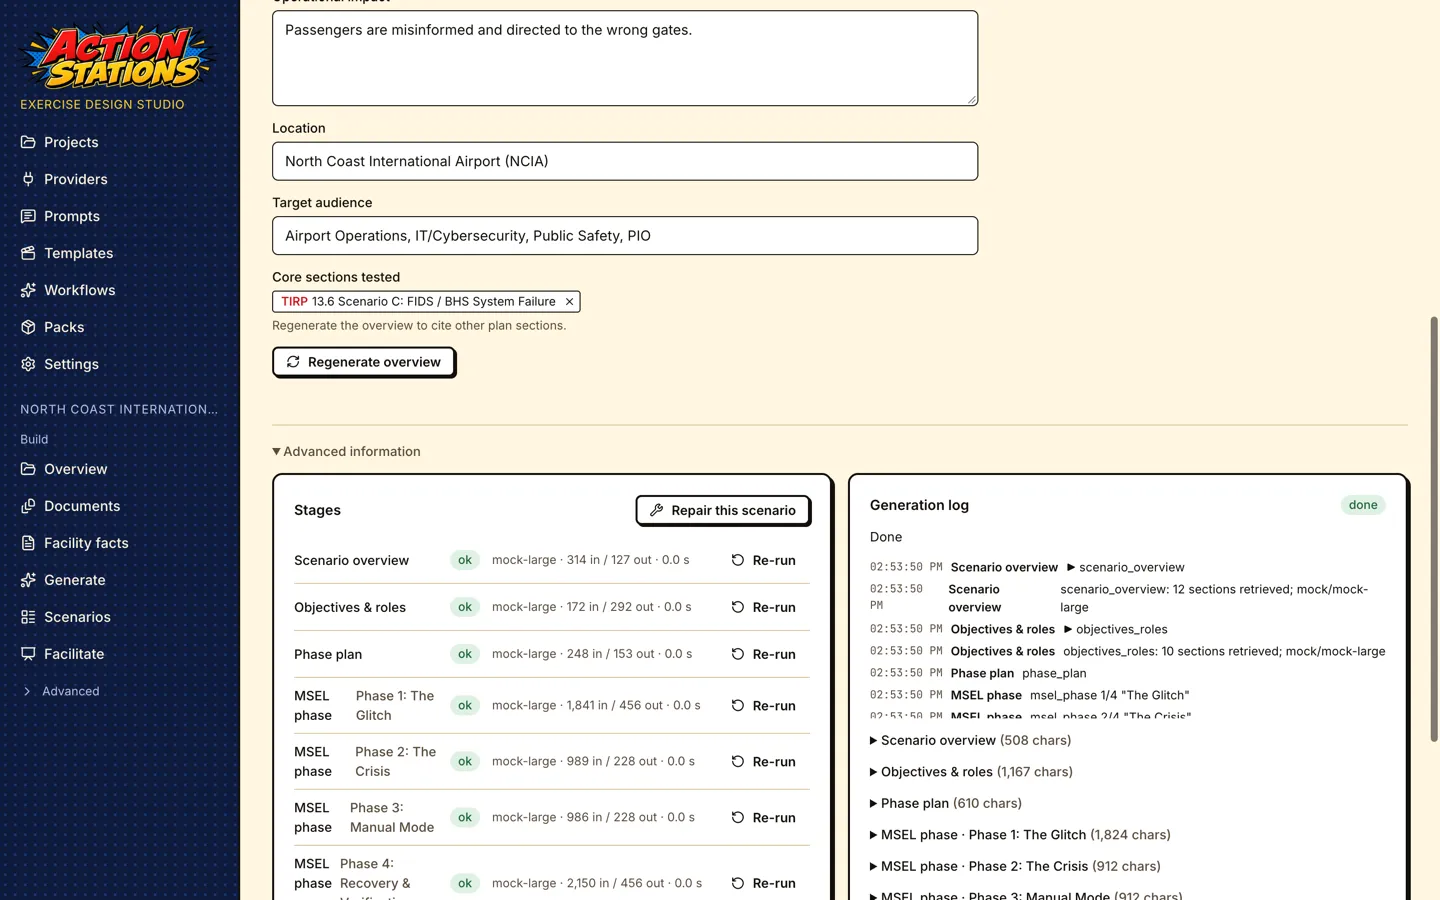
The stages run in this order: scenario overview, objectives & roles, phase plan, one MSEL phase per exercise phase, controller handbook, rubric, evaluation guides, player briefing, hot wash, critique, and a revision pass over the MSEL phases using the critique. You can leave the page; the job keeps running, the sidebar’s Background jobs list shows it (see Background jobs and restarts), and the page picks it up again when you return.
Measured with qwen3-30b-a3b-2507 on Apple Silicon: 340 seconds end to end, MSEL phases of 21,000 to 29,500 input tokens each.
8. Read and edit the result
Section titled “8. Read and edit the result”When the run finishes, the bar above the tabs says what to do next, with one button for it and a progress line (Timeline: N events, Injects written: n/N, Media rendered: n/N, Checks: no errors or the error count):
- Next: write N injects with Write N injects (the same job as Write all injects on the Injects tab).
- Next: render media (n/N) with Render media.
- Next: fix N errors found by the checks with Show the errors (opens the Warnings tab), only while lint reports errors; you can still export.
- Ready. Next: generate the evaluation guides with Generate evaluation guides, when a ready scenario has none yet (one written before 0.6.0, or a hand-authored one). One model call runs the
eegstage alone; nothing else in the scenario changes, and Facilitate and Export… are already available. - Ready: export or facilitate with Facilitate and Export….
While one of these jobs runs, the bar shows it (Writing injects…, Rendering media…) with its progress. The status badge in the header follows the same steps: Draft (injects missing), Injects written, Media rendered, and Ready once every inject is rendered and lint reports no errors. Next to it are Glossary and, until the scenario is ready, Facilitate and Export…. To have the injects written and the media rendered as soon as generation finishes, turn on Settings → Generation → Write injects and render media automatically after generation (off by default; the bar links to it).
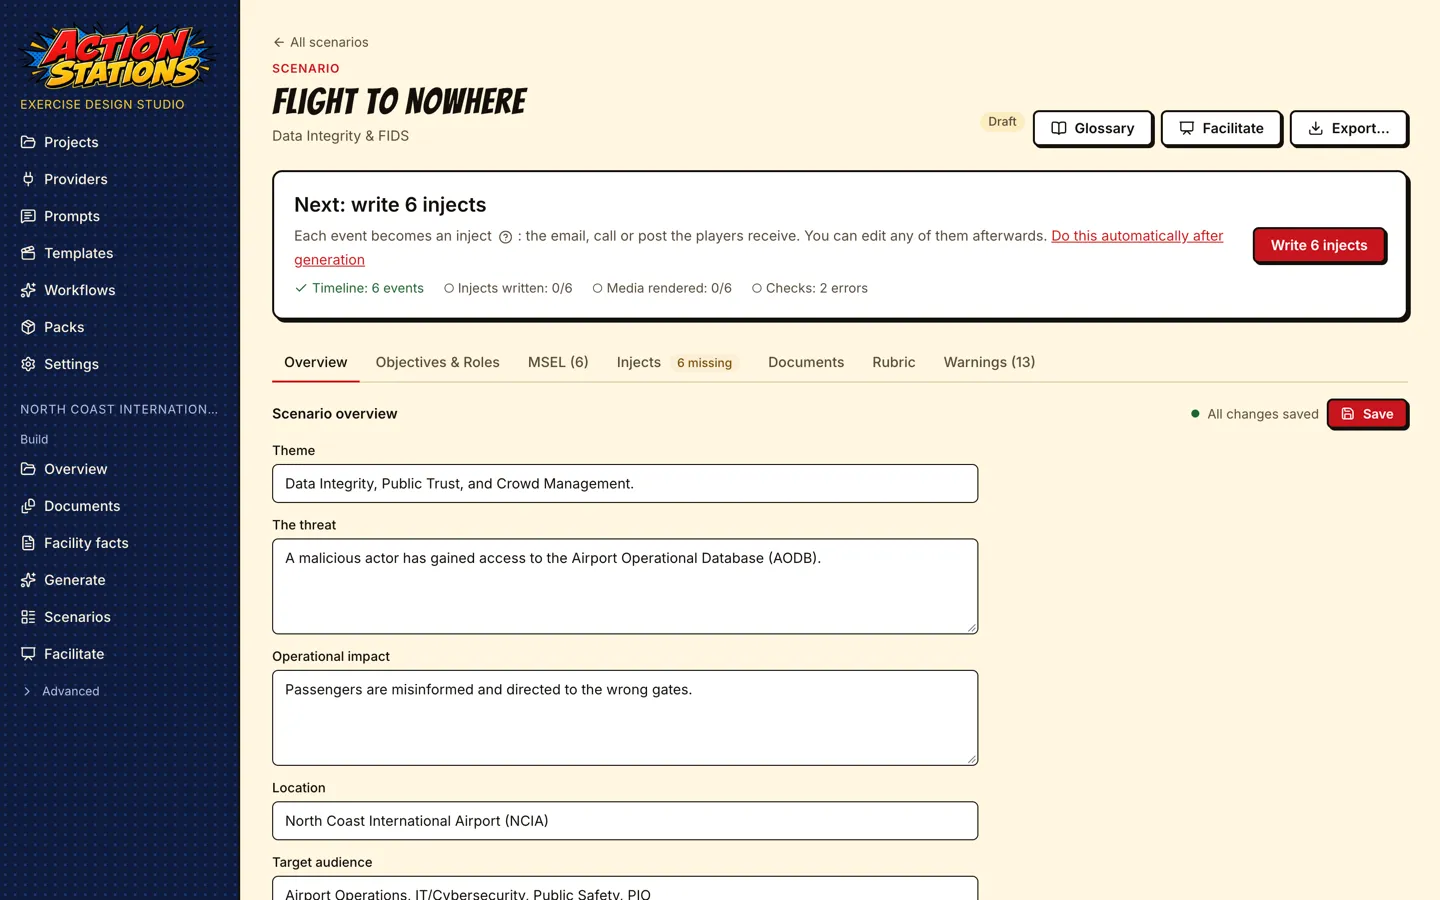
The tabs below the bar hold the scenario, and every tab is editable:
-
Overview: location, audience, theme, threat, operational impact and the core plan sections tested.
-
Objectives & Roles: exercise objectives, player roles with their standing orders, critical resources, and the SimCell scripts.
-
MSEL: the grid editor (below).
-
Injects: the inject deck, one card per MSEL row (below).
-
Documents: the Controller handbook, Player briefing, Hot wash guide (with its structured questions), the MSEL document, and two optional hand-written documents: Player handouts (reference cards, evidence packets, clue cards the players get) and Controller materials (facilitator-only material such as a clue-card deck with controller notes), each in a document editor (below). No generation stage writes the handouts; write or paste them yourself.
-
Rubric: grading metrics with points and Fail / Pass / Excellence behaviours, linked to injects.
-
Evaluation: each objective’s FEMA Core Capabilities (pick from the 32, grouped by mission area) and one Exercise Evaluation Guide (EEG) per capability: a capability target in your organization’s words and three to eight critical tasks, each quoting the plan section it comes from (“per TIRP 13.7, notify the FBI Cyber Task Force and CISA”), the role expected to perform it, its timing when the plan states one, and the MSEL rows where an evaluator would see it. Edit any of it; a task you write by hand picks its source from the plan sections the scenario already cites and is kept when you regenerate. Criteria by MSEL row shows what evaluators rate on each inject: its linked tasks, or its expected action when no task names it. Ratings are about procedures, not people.
-
Warnings: deterministic lint findings (for example a role with no inject in a phase) and the critique’s findings. Each one leads with a plain-language sentence, then the checker’s detail and its code (for example
ROLE_NO_INJECT). Must fix items come first; Go to row opens the MSEL tab on that row, Open inject opens the inject. The tab’s count is the same live check as the list. Below the checks, Review notes lists what the critique flagged when it read the scenario. Once you edit a note’s row, or the inject written from it, the note may quote text that is gone: it moves under N older notes on rows changed since the review, folded away. Saving an inject whose fields now match its template also clears its field warnings (including “fields repaired to fit the template”).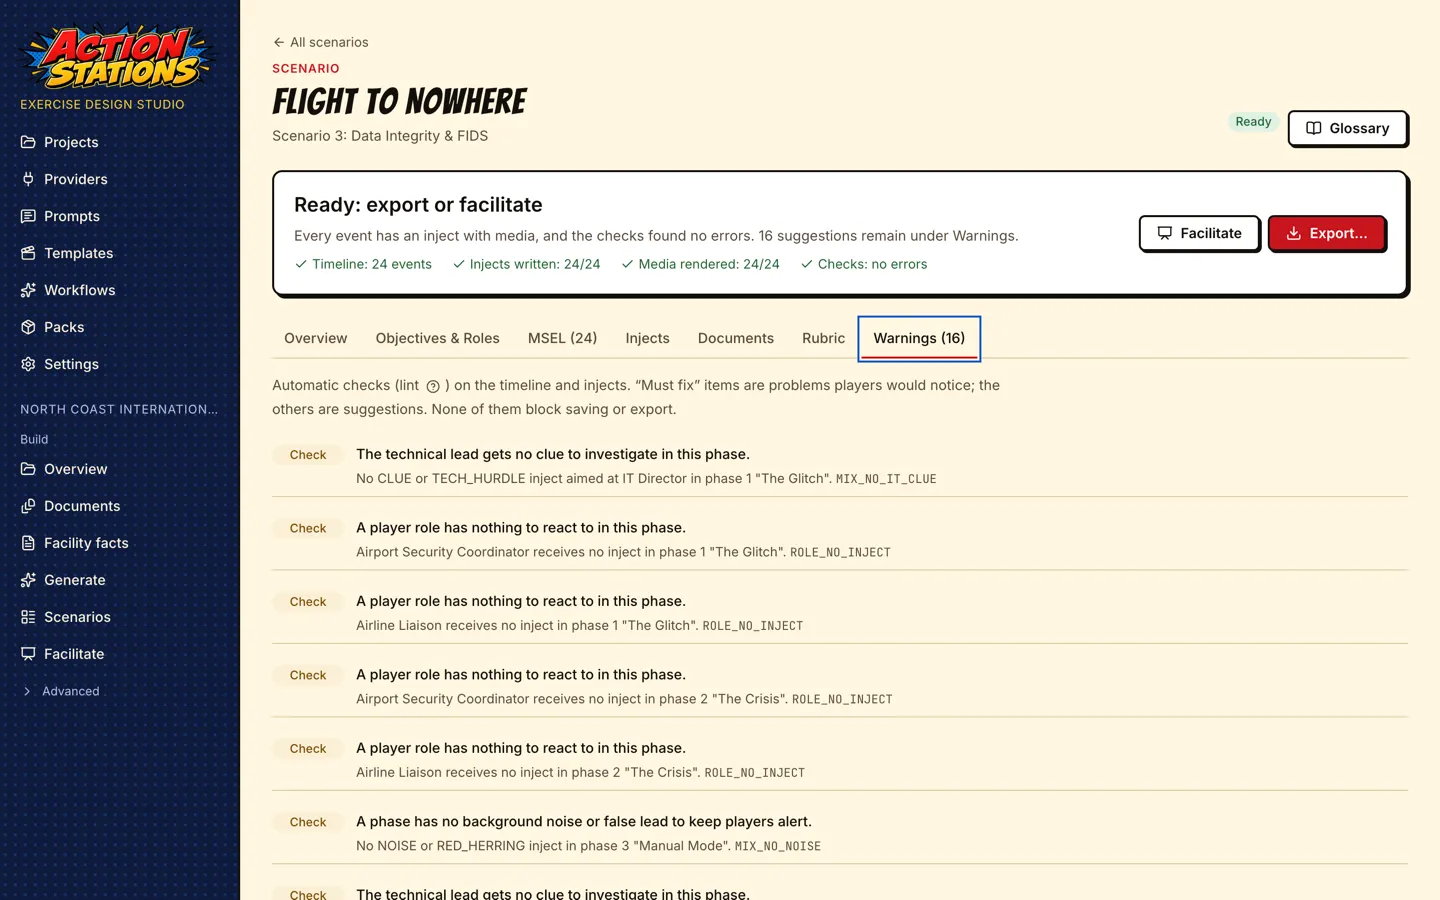
Everything is stored in <project>/scenarios/<id>/: scenario.json, the idea it was developed from (idea.json), and the handbook, briefing and hot wash as Markdown under documents/. The Scenarios page lists every scenario in the project.
The MSEL editor
Section titled “The MSEL editor”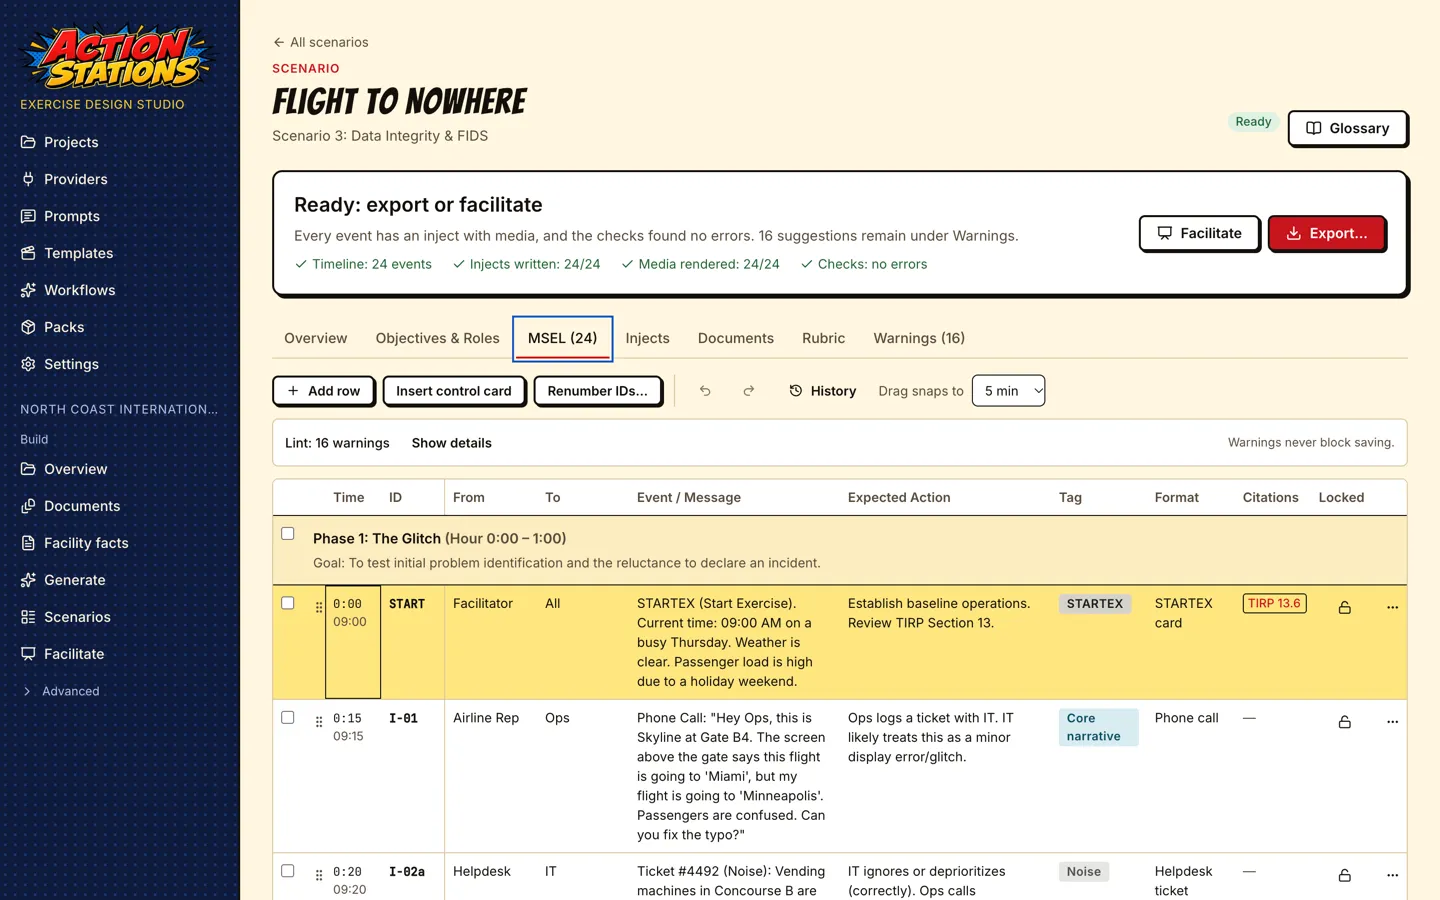
- Click a cell, or move with the arrow keys, Home/End and Page Up/Down; Enter edits and saves the cell, Tab moves on, Esc cancels.
- Add row and Insert control card (a time jump) add rows; drag a row by its handle to retime it (Drag snaps to sets the step).
- Select rows with their checkboxes to Shift times by a number of minutes or Move to another phase.
- Renumber IDs… previews and applies
I-01,I-02, … in time order; rubric links and the injects attached to each row follow the new IDs. - Lock a row (padlock) to keep it when the MSEL stage is re-run.
- Rows that the evaluation guides link to show “Criteria: T-01, T-04” under the expected action. Criteria column in the toolbar adds a read-only column with the same task ids (hover for the task text); the arrow keys skip it.
- The lint bar shows the current warnings; warnings never block saving.
- Edits save automatically, also when you switch tab or page right after an edit. A save only replaces the phases and MSEL rows: if the scenario changed meanwhile (a job or another editor wrote it), your edit is applied onto the newer copy. Undo/Redo and History (saved snapshots you can restore) are in the toolbar.
The document editors
Section titled “The document editors”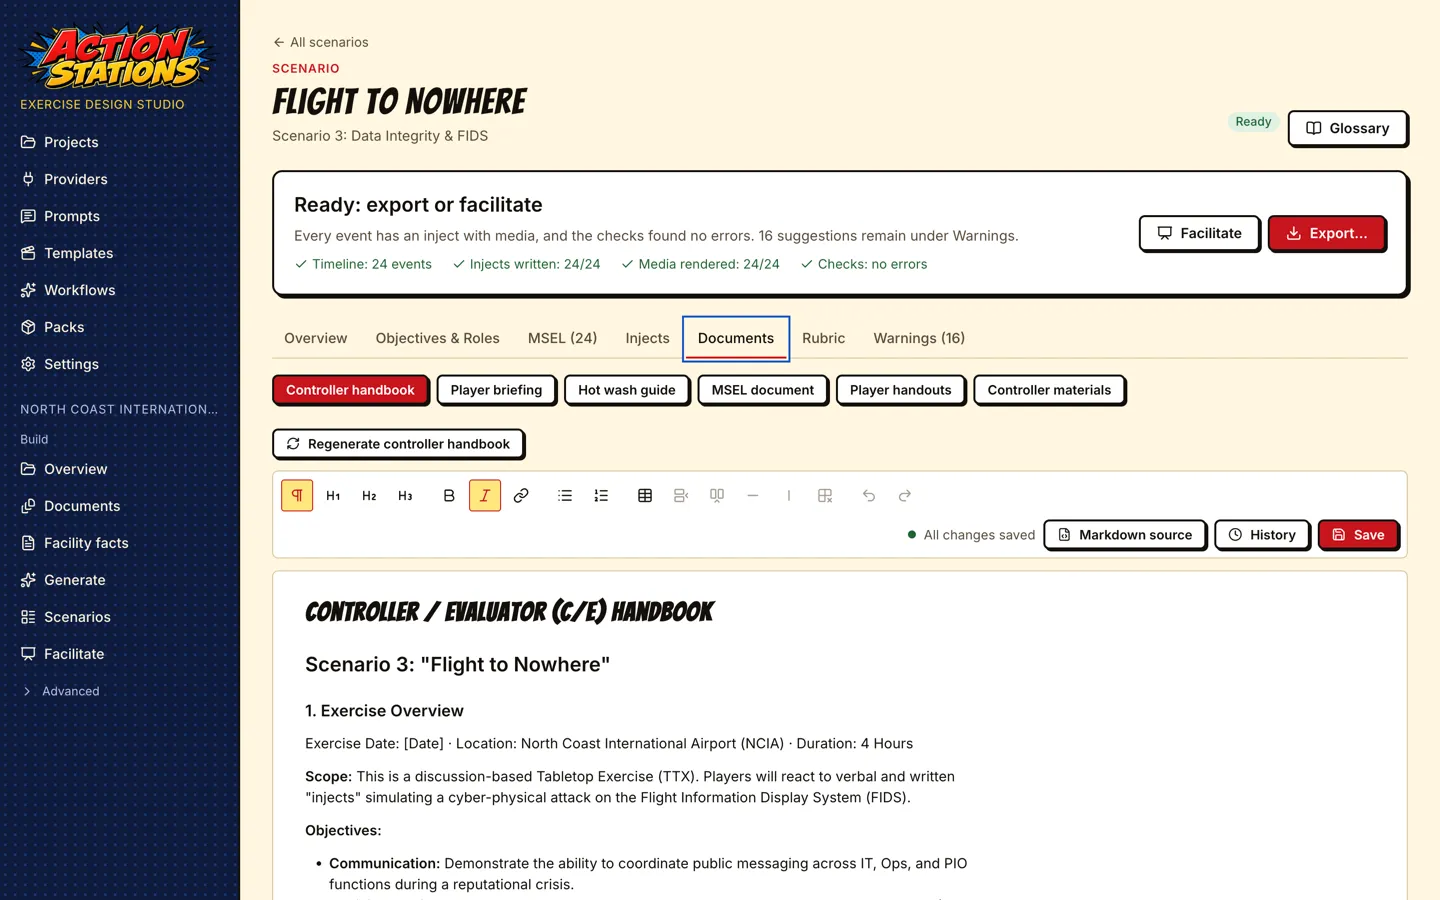
Each document has a formatting toolbar, a Markdown source toggle, autosave plus Save, and History with a diff against the current text and Restore. Regenerate … re-runs the stage that writes the document, with optional instructions; if you have edited the document, it asks first and keeps a history snapshot of your version.
Injects and media
Section titled “Injects and media”The Injects tab shows the deck: one card per MSEL row in time order, with a thumbnail of the rendered inject, its type, purpose tag, recipient, and badges for audio, video, warnings and locks. Filter by phase, purpose, type or media.
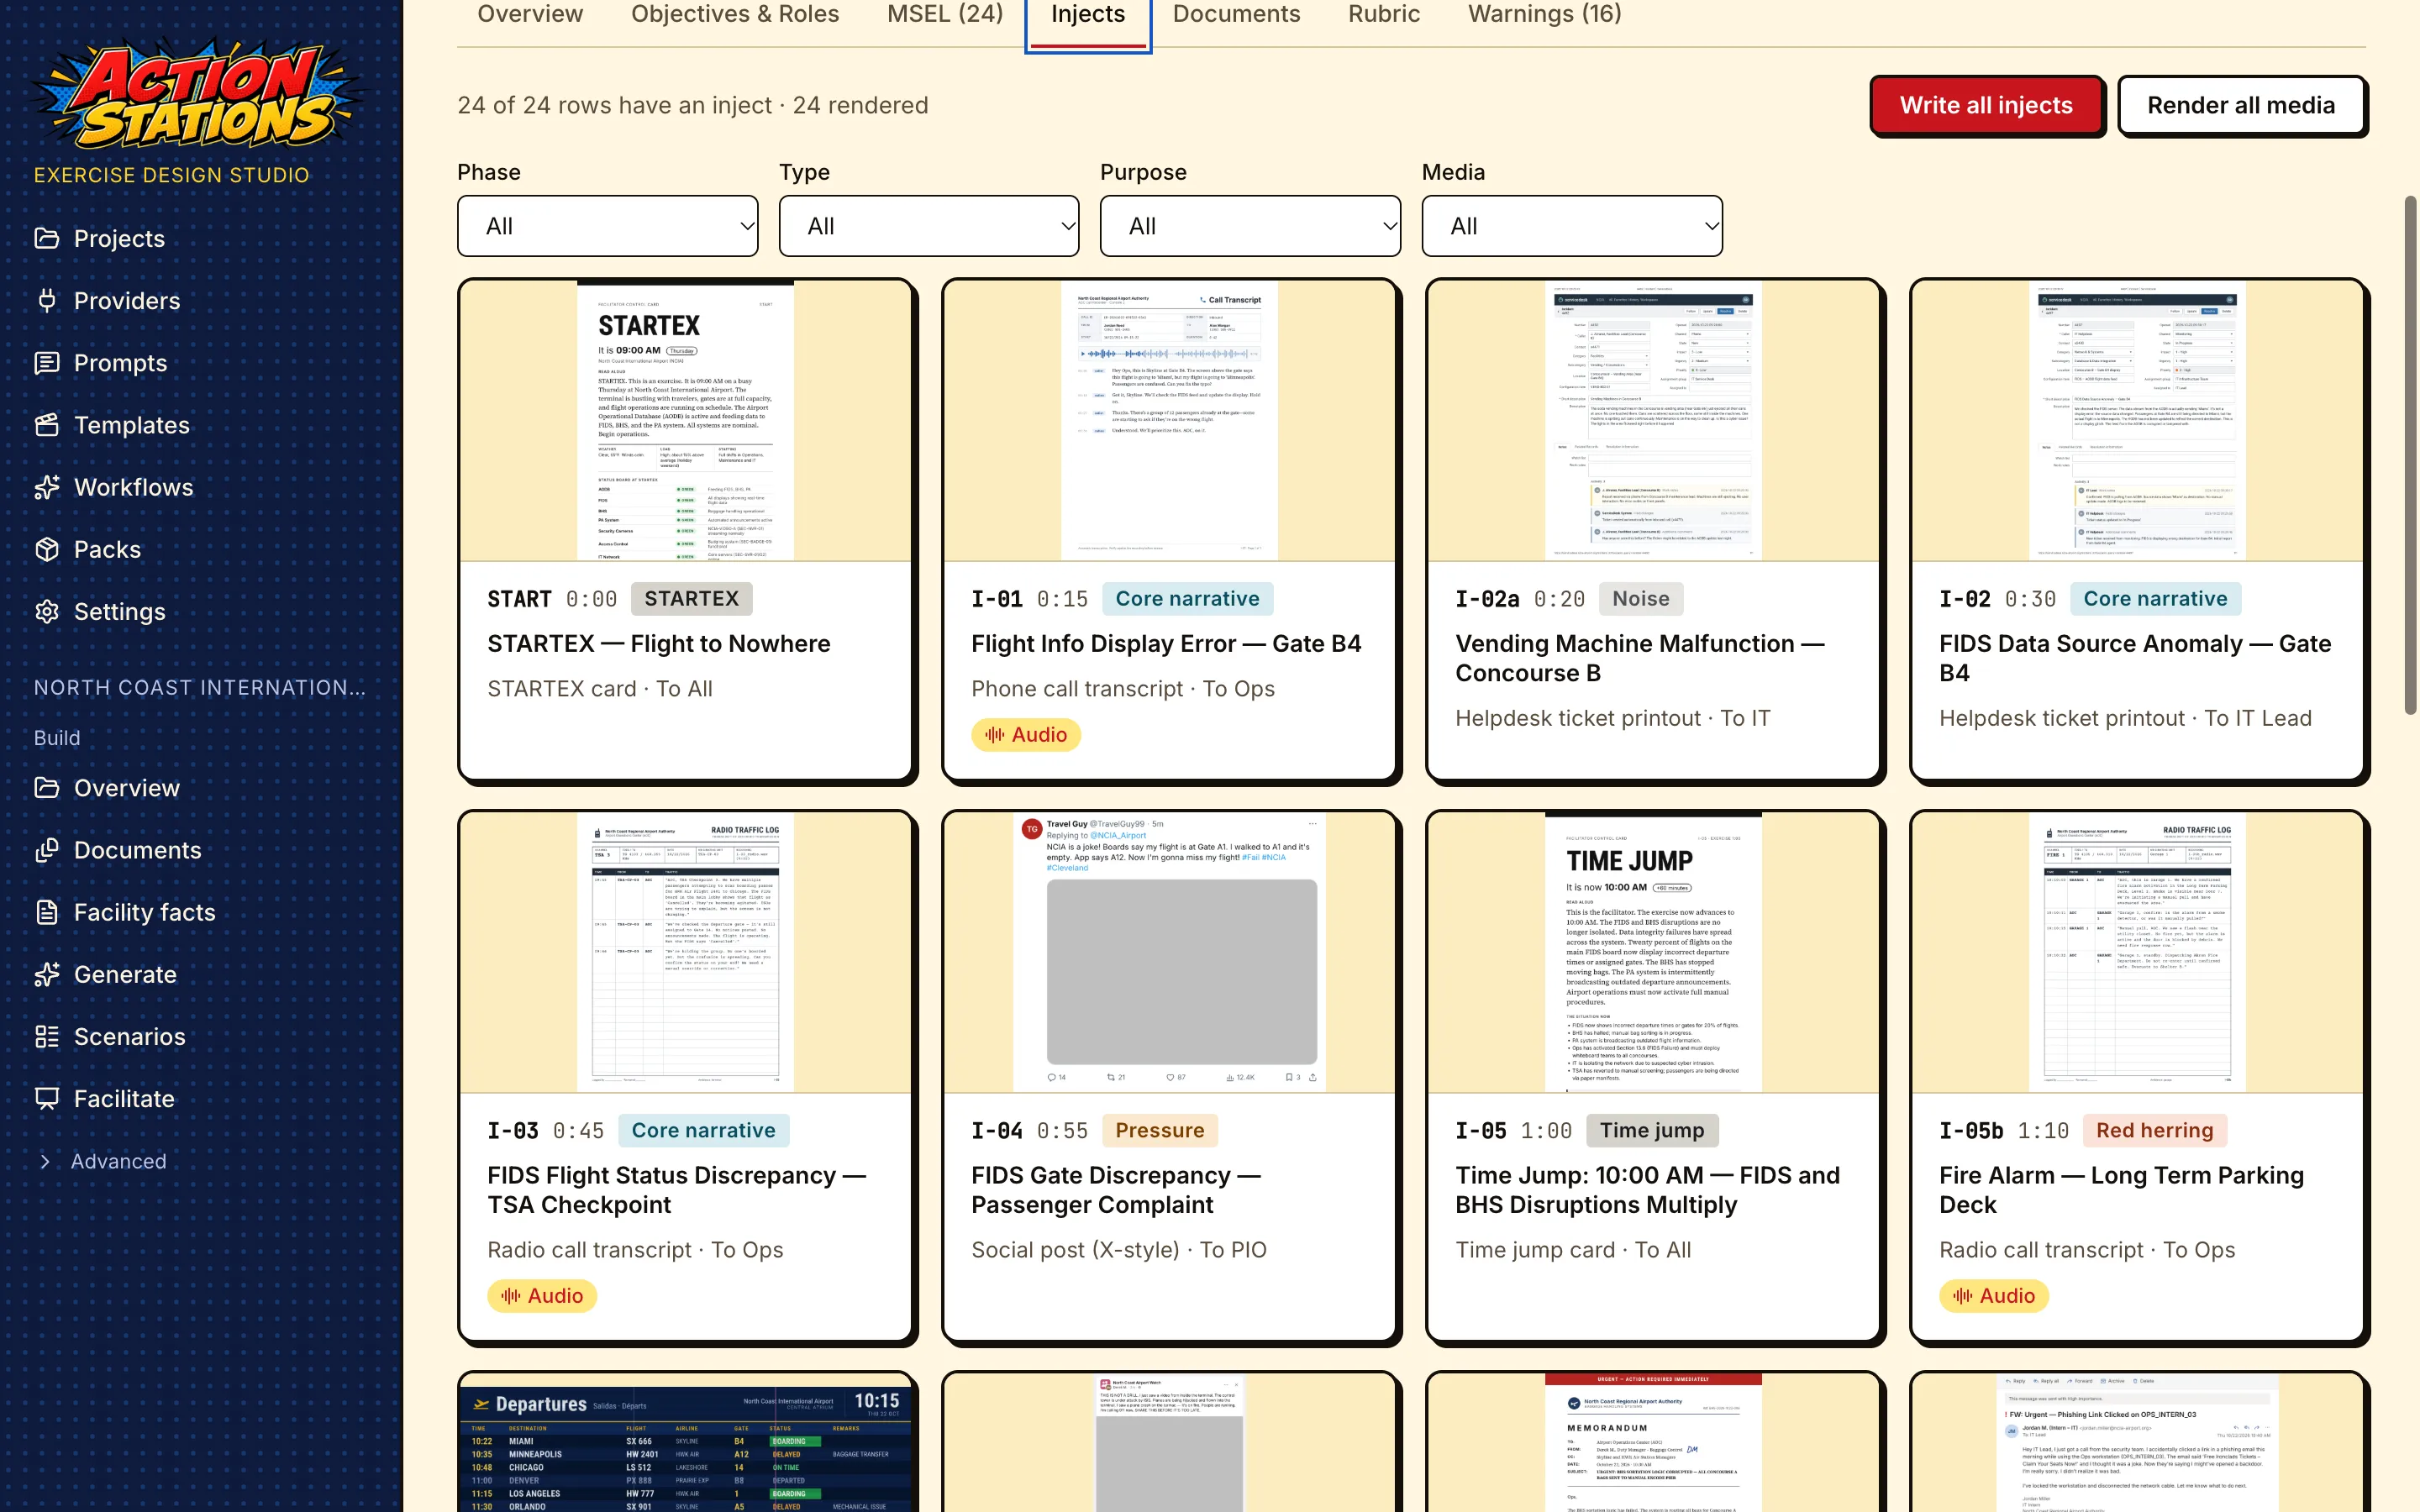
- Write all injects runs the inject text stage for every row: it picks the inject type (a tweet, a helpdesk ticket, a FIDS board, a radio call transcript, …) and fills that template’s fields from the MSEL row and the plans. Progress is shown per inject, and the job can be cancelled.
- Render all media renders every inject: template pages as PNG (and PDF for paper injects), plus AI photos and clips through ComfyUI and voice through text-to-speech where the inject calls for them and those providers are routed (see the provider guides).
Click a card to open the inject editor. From the keyboard the deck is one Tab stop: the arrow keys move between cards (Up/Down by a row), Home/End jump to the first/last card, and Enter opens the inject (or Create… for a row without one).
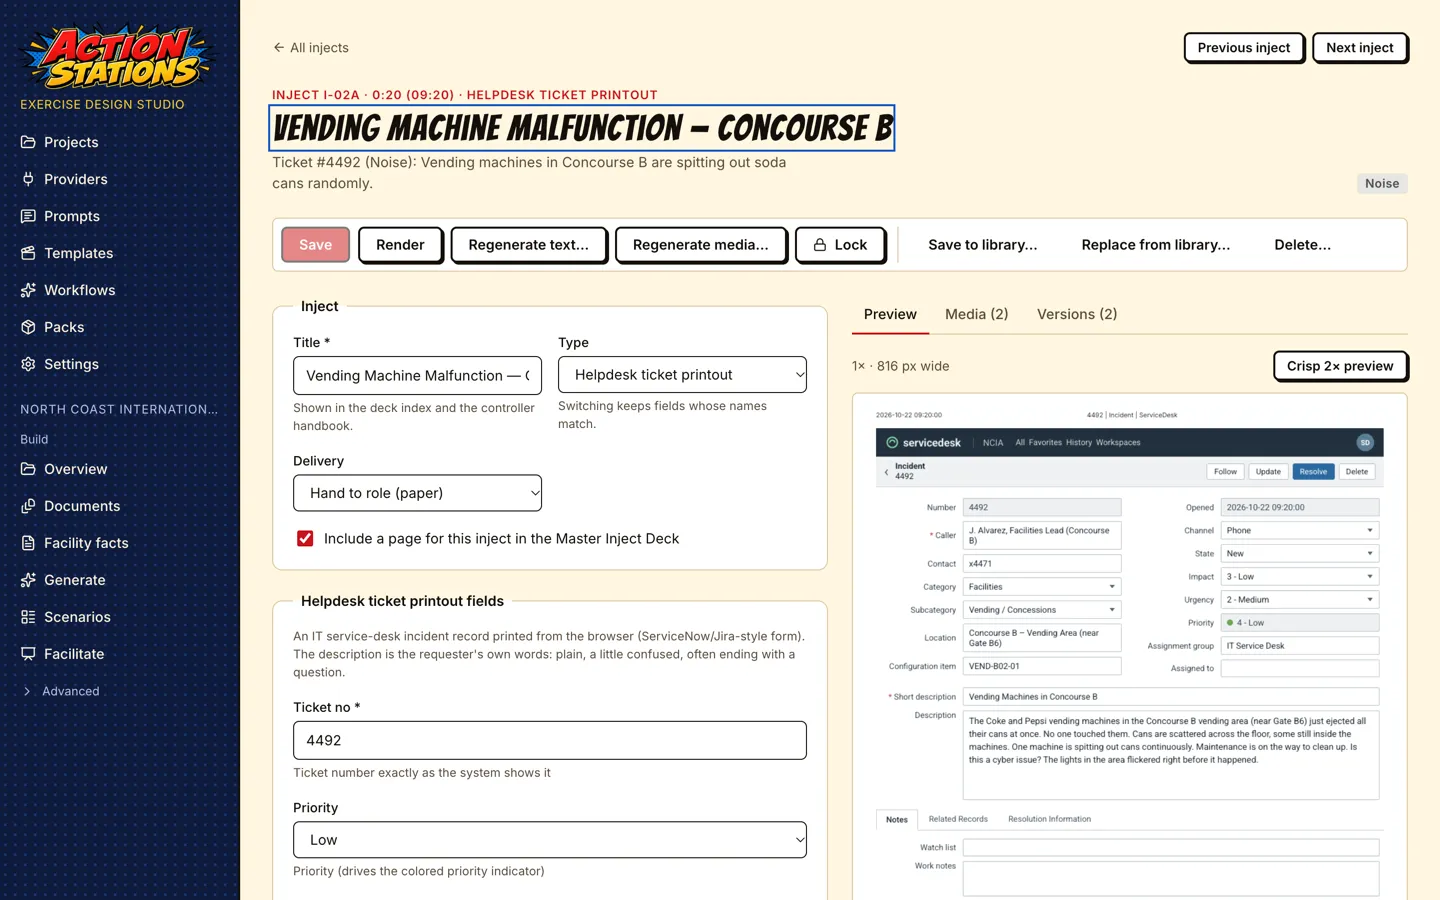
- The left side is a form built from the template’s schema: title, type (switching keeps fields whose names match), variant (saved with the inject and used by Render and export), delivery (hand to a role, show on the main screen, play audio, read aloud), whether it gets a page in the Master Inject Deck, then the template’s own fields.
- The right side has a live Preview (fast 1× or crisp 2×; image slots show the inject’s own AI images, or the template’s sample images when it has none), Media with each file’s provenance (provider, model, prompt, seed, workflow or template version), and Versions, with a diff and Restore.
- The toolbar has Save (Cmd/Ctrl+S), Render (Cmd/Ctrl+Enter saves and renders), Regenerate text… and Regenerate media… (with optional instructions; regenerated fields are shown as changes before you keep them), Lock, Save to library…, Replace from library… and Delete…. Previous inject and Next inject walk the deck.
- A locked inject cannot be edited or regenerated until you unlock it.
While generation is running
Section titled “While generation is running”A scenario runs one generation job at a time. While it runs, your edits to that scenario are kept in the editor and a banner says “Generation is running for this scenario”; they are saved automatically when the job finishes. If you leave a tab or document before such a save goes through, the edit is kept: the scenario page shows “1 unsaved change pending” and saves it when the job finishes, or the editor takes it back when you return. Inject edits are saved by hand; an inject with unsaved edits shows a Draft badge on its deck card, and the scenario page says how many injects have an unsaved draft (export and rendering use the saved version).
Closing the main window quits the app, on macOS too. Quitting with unsaved work (an inject draft, an edit waiting for a job to finish, or a save that failed) asks first: the You have unsaved work dialog lists what would be lost and offers Quit and discard or Cancel (the default). Edits waiting only for autosave are saved before the app quits. Field warnings from inject generation (INJECT_FIELDS_INVALID) and from rendering (INJECT_RENDER_INVALID, which lists the fields the template refused) are cleared when you save fields that match the template. INJECT_FIELDS_REPAIRED marks a value the app changed to fit the template (an out-of-range choice, a handle that was too long); check it and save. A row the model could not write is flagged INJECT_TEXT_FAILED in the inject deck; a control card built from its MSEL row after the model failed is flagged INJECT_TEXT_FALLBACK.
Improve a stage
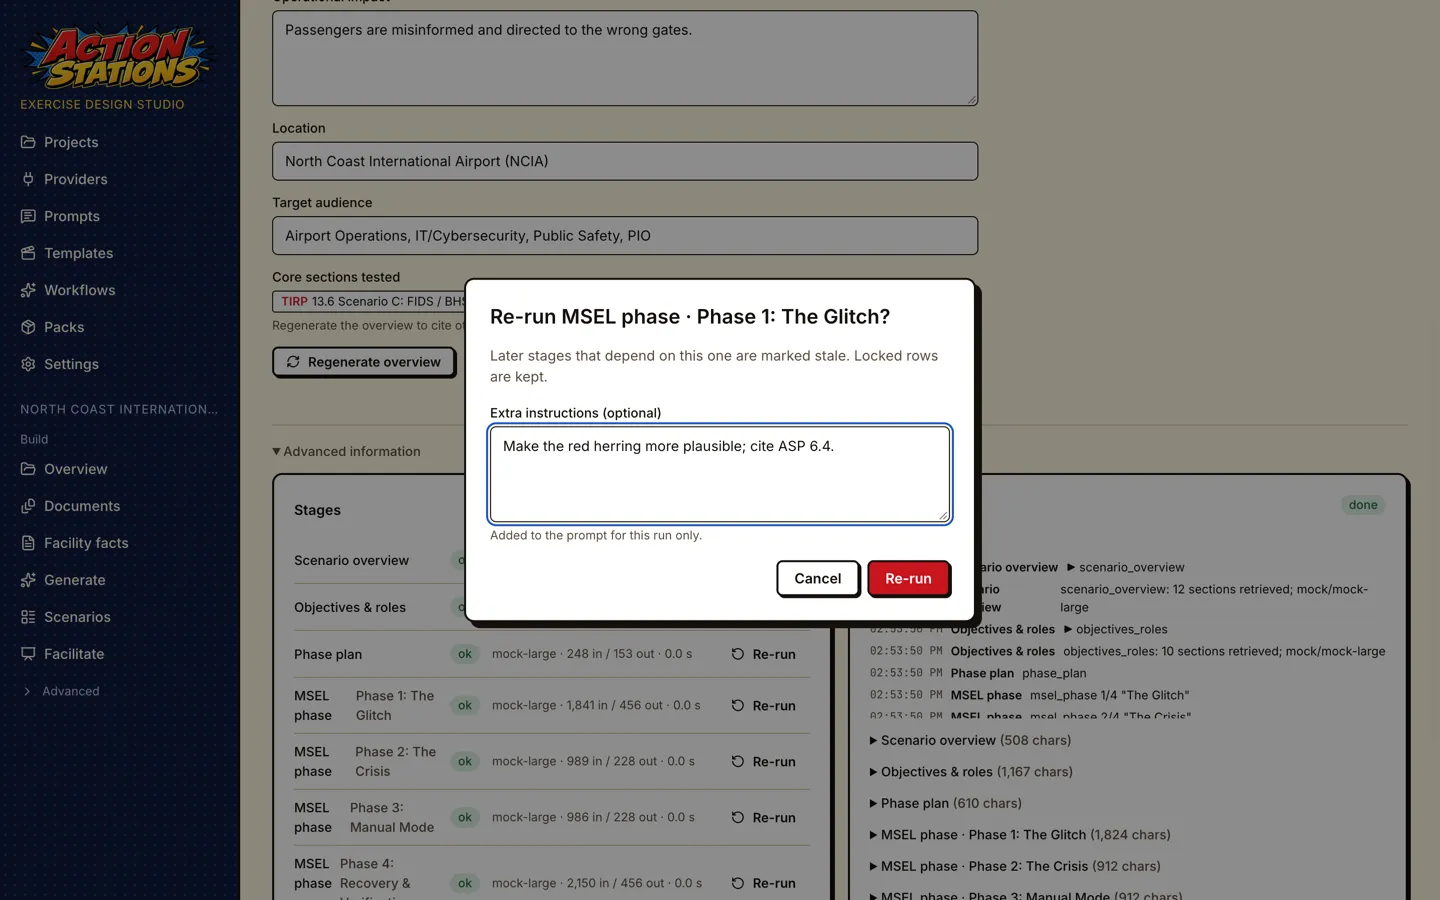
Section titled “Improve a stage”The Stages panel under Advanced information lists the latest run of each stage. Per-inject stages (inject text, media brief, media render) are grouped into one collapsible row per stage with ok/error/stale counts; a group with errors starts expanded. Each stage has Re-run. The dialog takes Extra instructions for that run only (“make the red herring more plausible; cite ASP 6.4”). Stages that depend on the re-run one are marked stale; locked MSEL rows are kept. When a re-run of an MSEL phase, the phase plan or the critique changes a row’s event, expected action or format, that row’s inject text and media are marked stale too, and Write all injects on the Injects tab writes them again. An inject whose row was removed is left out of the deck and the export. If a stage fails, Continue from failure resumes from it. Each run shows its model, tokens and duration; runs on a remote provider that reports prices also show their cost, and the panel head shows the scenario’s total. To change how a stage writes every time, edit its prompt: see the prompts guide.
Repair a scenario
Section titled “Repair a scenario”A scenario generated by an older version of the app can be brought up to date without regenerating it. Open Advanced information at the bottom of the scenario page and click Repair this scenario at the top of the Stages panel; the Repair this scenario? dialog explains what it does, and Repair starts it. Repair applies the current MSEL repairs and checks, rewrites only the injects whose rows changed or that are missing, and re-renders only stale or missing cards; everything else stays as it is, and the scenario history keeps the previous version. Tick Also generate missing AI stills to have it create the AI images that briefs plan but that were never made (this uses your image provider). Progress shows in a banner above the stages and in the generation log, with Cancel job.
Background jobs and restarts
Section titled “Background jobs and restarts”Long jobs (imports, index rebuilds, ideas, generation, inject writing, media rendering, export) keep running when you move to another screen. The sidebar’s Background jobs list, at the bottom of the sidebar, shows each one with its progress, Cancel and a link back to its screen; the screen picks the job up again when you return. The list is hidden while nothing runs.
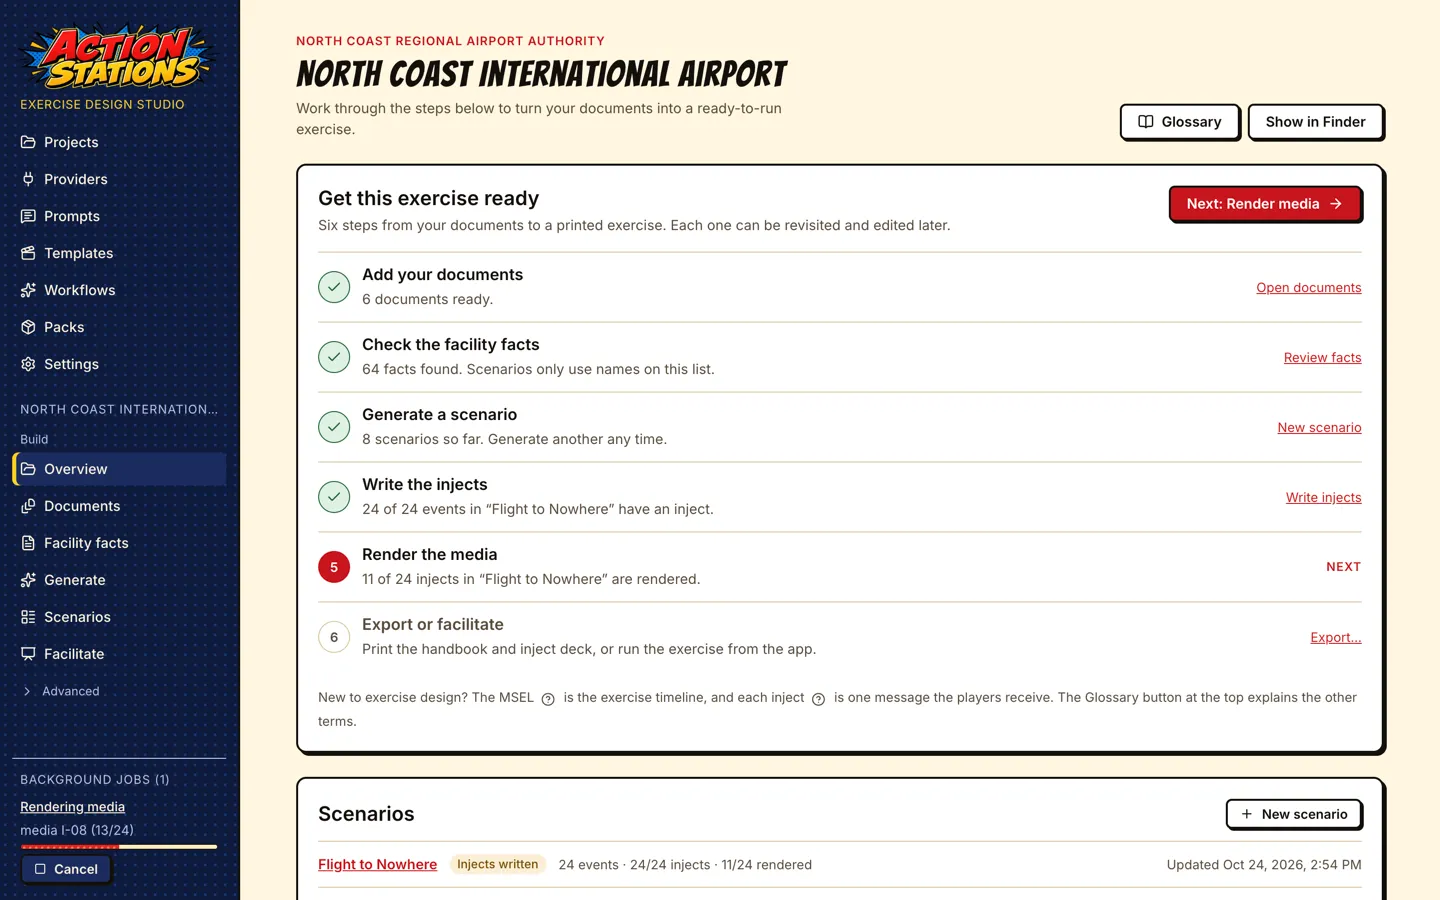
If the app closes while a job runs, the job comes back as interrupted after the restart (in the jobs list, the inject deck, the inject editor and the generation log), and nothing is locked meanwhile. A scenario generation or stage re-run can Resume from its last checkpoint; other jobs offer Dismiss, after which you start the work again (for example Write all injects). Starting new work on the scenario also replaces the interrupted record.
9. Run the exercise (facilitator mode)
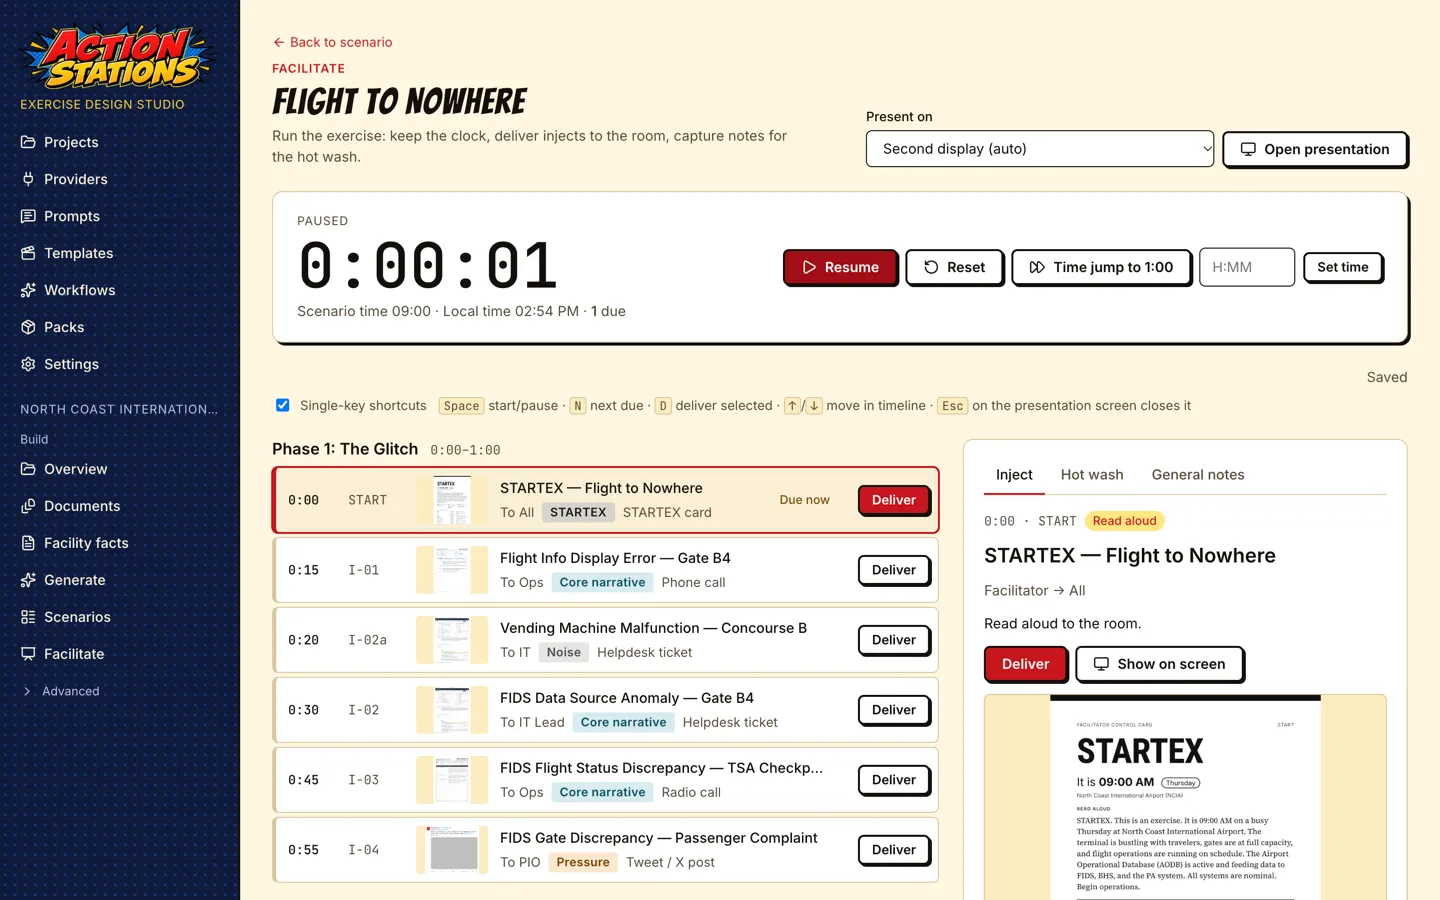
Section titled “9. Run the exercise (facilitator mode)”Open Facilitate in the project sidebar and pick a scenario.
-
Exercise clock: Start/pause (Space), Reset, Time jump to the next phase, or type a time (
H:MM) and Set time. The scenario’s wall-clock time is shown under it. -
Timeline: every MSEL row by phase; rows whose time has come are marked Due now. N selects the next due row, the arrow keys move through the timeline, and Deliver (D) records when it was handed over.
-
The single-key shortcuts (Space, N, D) can be switched off with Single-key shortcuts next to the key list (useful with speech input or a screen reader). They never fire while you type, and Space on a focused button presses that button.
-
Show on screen opens the inject’s media full-screen on the display chosen in Present on (a second display by default); Esc on that screen closes it. The header button reads Open presentation (shows the selected row’s inject) while no presentation is open and Close presentation while one is.
-
The side panel has four tabs: Inject (event, expected action, instructor note, and a hot wash note for that inject), Evaluation (below), Hot wash (the observations rolled up by objective and Core Capability with each item’s plan citation, the rubric, the hot wash questions and all inject notes) and General notes.
-
Evaluation: the selected inject’s criteria, each with four rating buttons (Met, Partial, Not met, Not observed) and a note. The criteria are the critical tasks of the evaluation guides that name the row; a row no task names is rated on its expected action. An optional Evaluator label (“Evaluator 2”) is stored with each rating; nothing asks for a player’s name. Counts per rating show in the hot wash; nothing is scored.
-
Regulatory clocks (under the exercise clock): the reporting deadlines of the regulations switched on in Project settings → Compliance. A row marked Starts a reporting clock starts its clocks when you deliver it; Fire trigger starts one by hand at a scenario time you type (blank means now). Each clock shows its regulation, filing and recipient, the deadline in scenario time, the time left and its status in words: running, due soon (a quarter of the time left), overdue, met, missed or waived. Filed… records when players would have filed, Missed and Waive… (with a reason) close it, and Undo reopens it. Show on screen puts the clock on the presentation screen (“due in 61 h 12 m”). A screen reader hears status changes, not the countdown. The method behind it is in Reporting deadlines and compliance coverage.
The clock, delivered injects, regulatory clocks and notes are saved in <project>/scenarios/<id>/facilitator.json, and the ratings in <project>/scenarios/<id>/evaluation.json, so a session survives a restart.
After the exercise: surveys
Section titled “After the exercise: surveys”Click Surveys on the scenario page. New survey creates the HSEEP Participant Feedback Form, a knowledge check or a confidence self-assessment (each made as a before and an after edition), a facilitator debrief, a controller/evaluator debrief or a blank survey. The Questions tab edits the title, introduction, timing and status, and the sections and questions: rating (1 to 5), multiple choice (one or several answers, an optional “Other”, and for a knowledge check the correct answer), free text and confidence statements. Move up and Move down reorder them. Changes save a moment after you make them; the two editions of a before/after survey keep the same questions. Preview shows the survey as participants see it.
Deliver… → Print form writes a fill-in PDF to the export folder (surveys/ inside the scenario’s export folder). Mark a survey Ready to include it in every export and in the distribution ZIP’s players/ folder; debriefs and results stay in facilitator/. The printed form never shows the correct answers.
On the Results tab, Enter paper responses types the returned forms in one at a time (Save response, then the form clears for the next one; Remove the last entry undoes a mistake). The results above it update as you go: counts, means, medians and distributions, choice counts, free-text answers in no particular order, and the before/after comparisons. Until three responses are in (change this in Settings → Surveys), only counts are shown, so no answer can be traced to a person. Save results PDF writes the summary, with the knowledge check’s answer key, for the facilitator. Surveys and responses are stored in <project>/scenarios/<id>/surveys/.
10. Export the exercise
Section titled “10. Export the exercise”Click Export… on the scenario page (in the header, or in the next-action bar once the scenario is ready).
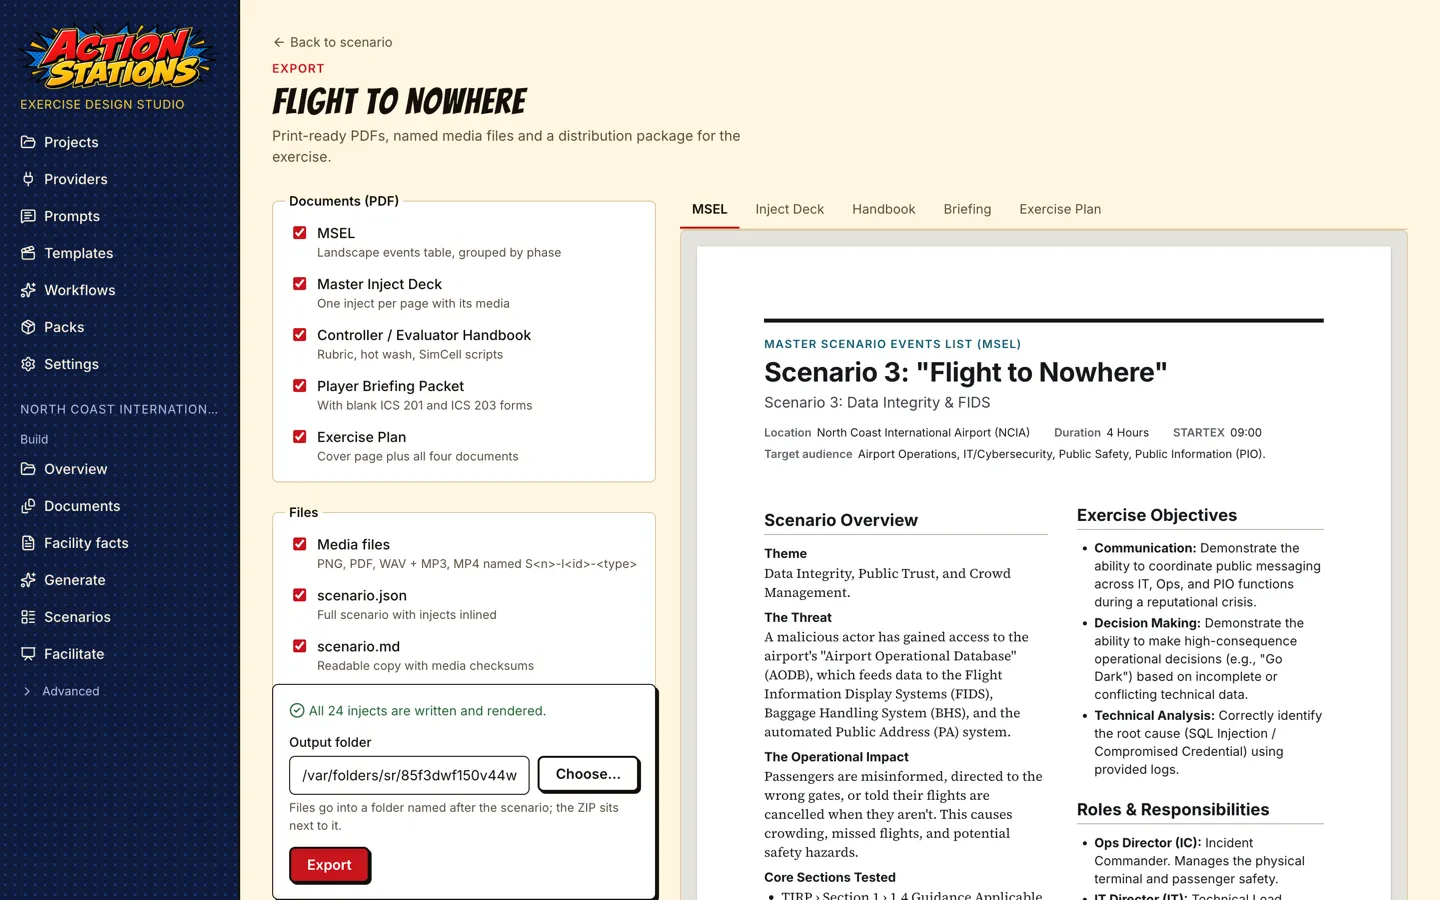
Choose what to export:
- HSEEP set: the Exercise Plan (ExPlan), the Situation Manual (SitMan) with one module per phase and its discussion questions, the C/E Handbook (HSEEP layout) with controller and evaluator instructions in the HSEEP 2020 order, and the MSEL workbook (Excel) with the common HSEEP columns (inject #, phase, scenario time, wall clock, event type, from, to, delivery method, description, expected action, objectives, capabilities, critical tasks, purpose, format, media file, controller notes, delivered at, notes) plus Overview, Objectives, Roles and Legend sheets. Also write the SitMan player edition adds a copy for players: module 1 in full, later modules as title, time window and questions only. It goes into
players/of the ZIP; leave it off when players should not see the modules ahead of play. These documents read the Exercise details tab on the scenario page (dates, sponsor, participating organizations, point of contact, site, communications plan, safety and security notes, acronyms, the exercise marking); a blank detail prints as a line to fill in by hand. The SitMan modules come from thesitmanstage, which runs after the hot wash; edit them on the same tab or regenerate them there. - Classroom set (PDF): MSEL (landscape events table by phase), Master Inject Deck (one inject per page with its media), Controller / Evaluator Handbook (with rubric, hot wash and SimCell scripts), Player Briefing Packet (with blank ICS 201 and ICS 203 forms) and the Exercise Plan bundle (a cover page, then the ExPlan, SitMan, HSEEP handbook, MSEL, deck and briefing in one PDF), the Exercise Evaluation Guides (landscape, one guide per Core Capability in the HSEEP 2020 layout: objectives, capability target, the critical tasks with their plan section, expected role, observation keys and M / P / N / NO boxes, then space for observation notes and analysis), Survey forms (every survey marked ready) and Survey results (when any survey has responses). A scenario with handouts also gets Player Handouts (with the briefing) and Controller Materials (with the handbook) PDFs.
- Compliance: Compliance coverage (Excel) has one sheet per framework switched on in Project settings → Compliance (NIST CSF 2.0, NIS2, DORA) with each control’s hierarchy, the MSEL rows mapped to it, the evidence level (planned, delivered, observed) and its references, a Clocks sheet with every reporting clock’s start, deadline, filing and result, and an About sheet. Compliance coverage (CSV) writes the matrix and the clocks as two CSV files. Both are off by default and stay in
facilitator/of the ZIP;scenario.mdgets a “Compliance coverage” section. - Files: Media files (PNG, PDF, WAV and MP3, MP4, named
S<n>-I<id>-<type>), scenario.json (the full scenario with injects and evaluation guides inlined), scenario.md (a readable copy with media checksums and an evaluation guides section), Word documents (both handbooks, the player briefing, the ExPlan, the SitMan and the EEGs as.docx) and the Distribution ZIP (facilitator/with everything,players/with the briefing, the forms, the player handouts, the participant survey forms, the ExPlan and the SitMan player edition when you asked for it; controller material, including the facilitator SitMan, debriefs, survey results and the EEGs, stays infacilitator/).
Before you export, HSEEP documents lists what is still missing: blank exercise details (with a link to the Exercise details tab), SitMan modules not generated yet, Exercise Evaluation Guides not generated yet (the ExPlan, C/E Handbook and MSEL workbook show the capabilities and critical tasks once they are). Each export also writes the same list as export-report.md into the export folder.
The right side previews each PDF before you export. The bar at the bottom of the options stays in view: it says whether every event has an inject and every inject is rendered (with a link to fix it), shows the Output folder and holds Export. The folder defaults to exports inside the project folder (created on the first export) or the folder you last chose for this project; Choose… picks another. Files go into a folder named after the scenario, its number and a short id (Flight-to-Nowhere-S3-79J4AB), so two scenarios with the same title never share a folder, and the ZIP sits next to it. The ZIP holds only the files from that export, not leftovers from an earlier one.
Measured on the Scenario 3 deck (24 injects): every target exported in 5.9 seconds, 54 files including a 20.6 MB distribution ZIP.
Player material. Player injects prints one card per inject players see, each picture followed by its words as text a screen reader reads. Player material sets the language of the briefing, handouts and player injects (English, Spanish, or both) and Also write a large-print copy adds an 18 point version of each. Spanish needs a reviewed translation; see Translation and accessible player material.
For other platforms. The Export screen also has Conducttr MEL (CSV), WebEOC / SimulationDeck package and CAP 1.2 XML. They are off by default; see Exercise platforms and real-world alert formats.
Keyboard, screen readers and zoom
Section titled “Keyboard, screen readers and zoom”Everything in the app works from the keyboard. Skip to main content is the first Tab stop; after you follow a link, focus moves to the new page’s heading and the window title names the page. Dialogs keep focus inside until you close them (Esc), then return it to the button that opened them. Below about 830 px of width (for example a 1280 px window at 200 % zoom) the sidebar folds behind a Menu button. Long jobs (ingest, index rebuilds, model downloads, generation, export) show progress with a Cancel button, announce progress to screen readers without flooding them, and failures say what went wrong and what to try next, with Retry where it applies. Notifications appear at the bottom left of the page, away from the primary buttons on the right. Selected items in lists use one style everywhere (a highlight with an accent bar; the domain picker also shows a check and names the current domain above the list); hovering only tints an item. Colors meet WCAG AA in light and dark (node scripts/check-contrast.mjs checks every token pair the stylesheets use).
Next steps
Section titled “Next steps”- How a good tabletop exercise is built: what the generator is aiming for.
- Prompts: change how any stage writes.
- Providers: other models, cloud models, images, video and voice.
- Templates: add or change inject templates.